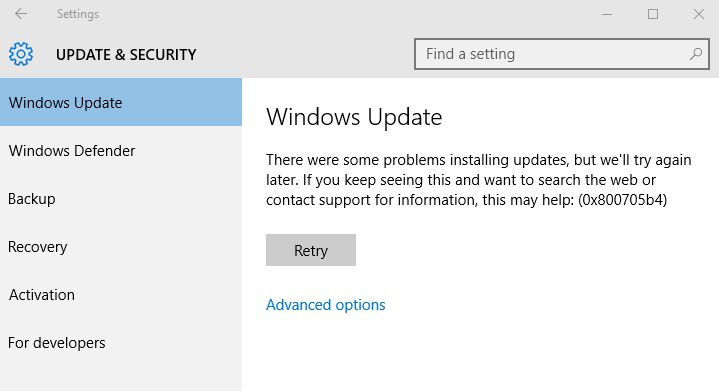
Windows 10 is quite the latest version of the Windows over Windows 8.1 in many ways. Today we are sharing about Fix Windows 10 Update Error 0x800705b4 One of the features that Microsoft gives to the users is the windows update that comes with good support and huge impact on the security as well as stability of the computer.
However, some people have reported that they are unable to install the windows update successfully in their Windows 10 computer.
There are various reasons for this, it can either system will not update or the update that is provided would have been corrupted. One of the common update errors that people reported is the 0x800705b4 windows 10 update error. If the error is not solved in the long run, the system would slow down or even crash.
Contents
- Fix Windows 10 Update Error 0x800705b4
- Run Windows Update Troubleshooter
- Reset Windows 10 Update Components
- Change the Settings of Windows Update
- Run DISM tool
- Delete Some Relevant Files
- Check the Integrity of File using SFC Tool
- Disable Windows Defender Temporarily
- Perform Clean Installation of Windows 10
- Perform Clean Boot and Install Updates Again
Fix Windows 10 Update Error 0x800705b4
So if you are disturbed about the error, you don’t have to worry about this error as we have the list of solutions which can fix this windows 10 update error in few easy steps.
So, readers who are facing this windows 10 update error can just go through this guide to find out the solutions you are looking for. Any of these solutions could help resolve the 0x800705b4 windows 10 update error in few seconds.
-
Run Windows Update Troubleshooter
Microsoft has provided the Windows Update Troubleshooter in the windows 10 OS and this can detect the actual problem and fixes it. So, it is better to give it a try and fix the error 0x800705b4.
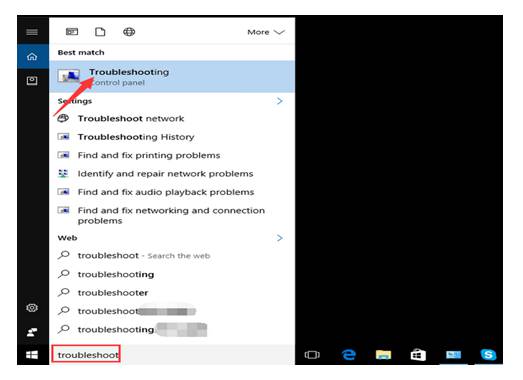
- At the bottom left corner of the desktop, in the Cortana type “Troubleshoot”.
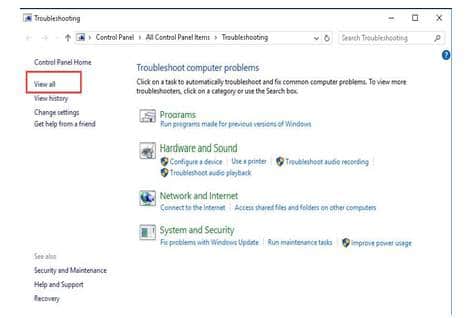
- Now a pop-up menu will open in which you need to locate and click on “Troubleshooting” option as shown in the below picture.
- In the left pane of the “Troubleshooting” window that appears, click on the “View All”.
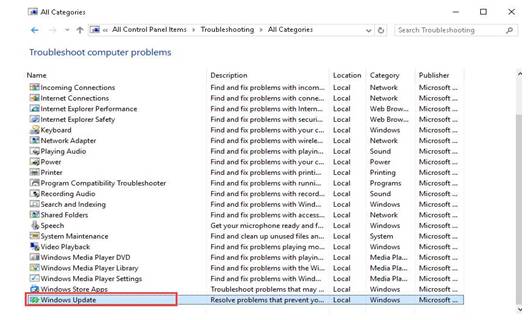
- From the list of the option, find and tap on “Windows Update”.
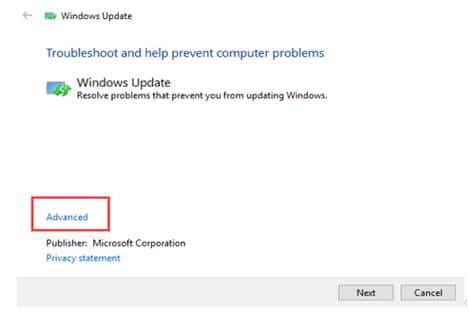
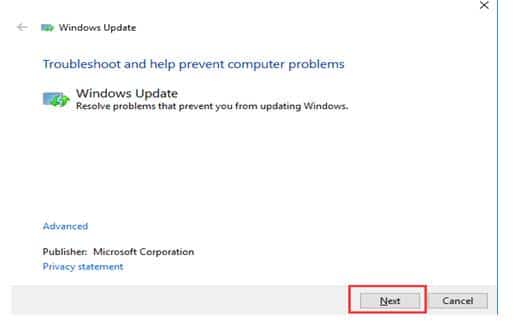
- In the Windows update window that is shown up on the screen, you need to click on “Advanced” at the bottom left corner.
- In another window, tap on “Run as Administrator” at the bottom of the window as shown in the below picture.
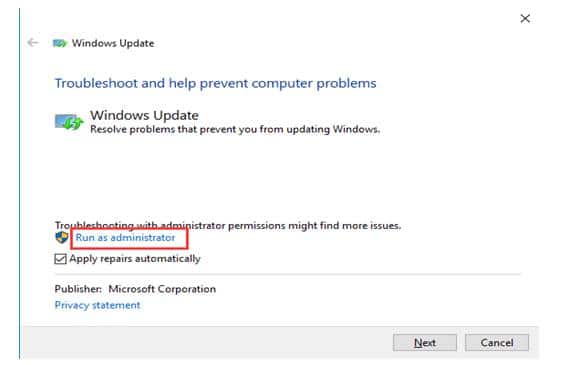
- Finally, click on the “Next” button at the bottom and it will start troubleshooting the issues and then fixes them.
That’s it once the process is completed you can check the windows 10 update error does not occur again. If the issue persists, try the next solution.
-
Reset Windows 10 Update Components
Some of the technicians of Microsoft have stated that, this error could occur because of the corrupted updates. It is said that, this error is seen in only those windows users who have upgraded from windows 7 or 8.1 to 10,
Instead of performing the clean install of the system. In this case, it is necessary for the users to reset the windows update components which can be done in the following way.
- Right-click on the Start Menu of your computer and then open the Command Prompt (Admin) i.e., in the administrator mode.
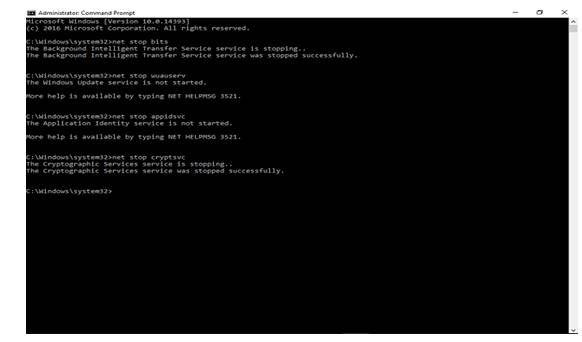
- Once the command prompt is opened, type all the below-given command one after the other pressing Enter button after each command as shown in the below picture.
- net stop bits
- net stop wuauserv
- net stop appidsvc
- net stop cryptsvc
- Once the related services are stopped, you have to erase a particular file.
- Again in the command prompt, type the below-given command and click Enter.
Del “{%}ALLUSERSPROFILE{%}ApplicationDataMicrosoftNetworkDownloaderqmgr*.dat”
- Next, we need to move to the next command i.e., cd /d {%}system32
- Now the users have to restart all the BITS files.
- Now, type the below given command one after other and click Enter after each command.
- exe oleaut32.dll
- exe ole32.dll
- exe shell32.dll
- exe initpki.dll
- exe wuapi.dll
- exe wuaueng.dll
- exe wuaueng1.dll
- exe wucltui.dll
- exe wups.dll
- exe wups2.dll
- exe wuweb.dll
- exe qmgr.dll
- exe qmgrprxy.dll
- exe wucltux.dll
- exe muweb.dll
- exe wuwebv.dll
- exe atl.dll
- exe urlmon.dll
- exe mshtml.dll
- exe shdocvw.dll
- exe browseui.dll
- exe jscript.dll
- exe vbscript.dll
- exe scrrun.dll
- exe msxml.dll
- exe msxml3.dll
- exe msxml6.dll
- exe actxprxy.dll
- exe softpub.dll
- exe wintrust.dll
- exe dssenh.dll
- exe rsaenh.dll
- exe gpkcsp.dll
- exe sccbase.dll
- exe slbcsp.dll
- exe cryptdlg.dll
- Now enter another command “netsh winsock reset” without quotes in the command prompt and click Enter for restarting the Winsock.
- Once the above process completes, you have to start back the services you have stopped before and for this you need to run the below-given command, pressing Enter after each command.
- net start bits
- net start wuauserv
- net start appidsvc
- net start cryptsvc
- Finally, close the command prompt and restart your computer.
Now, by doing this process the problem should be resolved most probably. If even it does not resolve, you need to give a try to the next fixes.
-
Change the Settings of Windows Update
Some of the users have reported that changing the windows update settings have resolved the error 0x800705b4 for some of them. So, try this solution.
- In the Cortana of the desktop, type “Windows Update”.
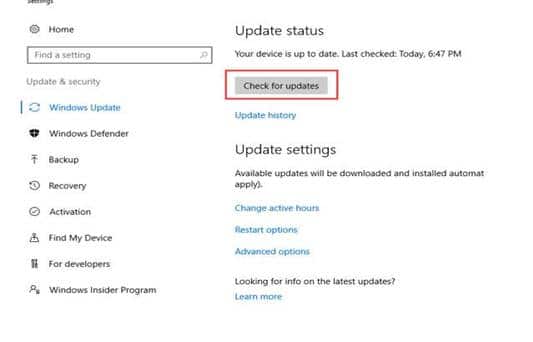
- On the pop-up menu that appears on screen, click on “Check for Updates”.
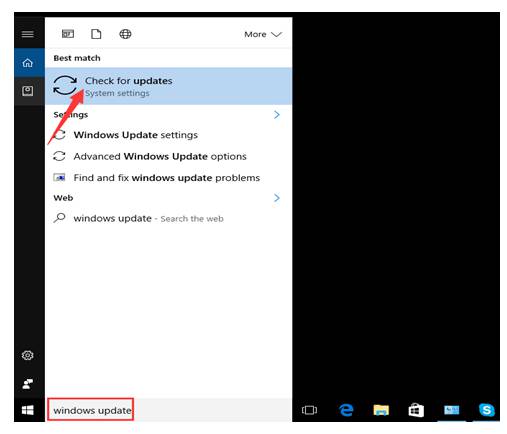
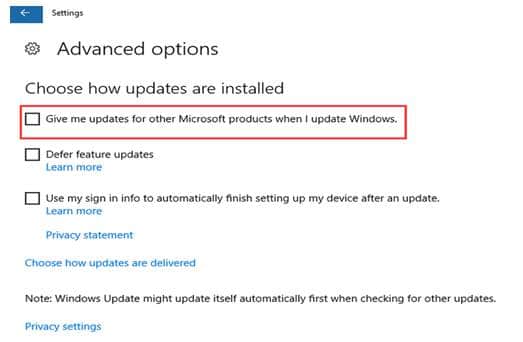
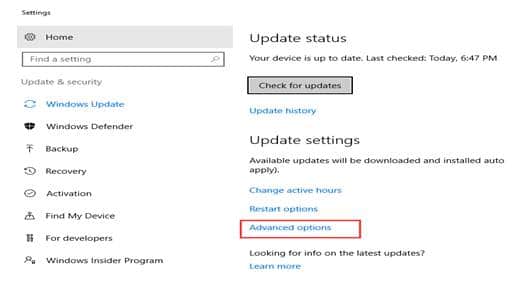
- From the settings menu, select and tap on the option “Advanced Options”.
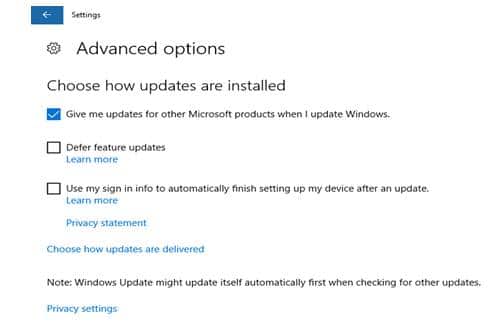
- Un select or un check the checkbox beside the option “Give me updates for other Microsoft products when I update Windows” as shown in below image.
- Now, you need to restart your PC for the changes to be saved and take effect.
- The next step is to open the Window Update Settings again as done in the first step.
- From the settings click on “Check for Updates” button in the right pane. You need to run it more than once for getting all the updates.
- Once all the updates are installed, you will get a message “Your device is up to date” and now you can continue with next step.
- From the Settings window, again tap on the “Advanced Options” and in the window that appears, re-select the option “Give me updates for other Microsoft products when I update Windows” that you have un-checked before.
- Again go back to the “Check for Updates” from the Settings and this time,
- The updates should be downloaded successfully.
-
Run DISM tool
DISM (Deployment Image Servicing and Management) tool can help in resolving the error with the windows update. This will fix the corrupted system files of your computer.
Note that, if the windows update is not functioning, you need to use the system installation disk and then DISM will be able to reach the files which should replace corrupted files. As DISM is a built-in tool, the users can run it via the command prompt in the following way.
- Go to the Start Menu of your PC and right click on it and open “Command Prompt (Admin)”.
- Now, type the below-given command and hit Enter.
DISM.exe /Online /Cleanup-image /Restorehealth
- The process will at least take 10 minutes.
- So, be patient and wait till the process completes.
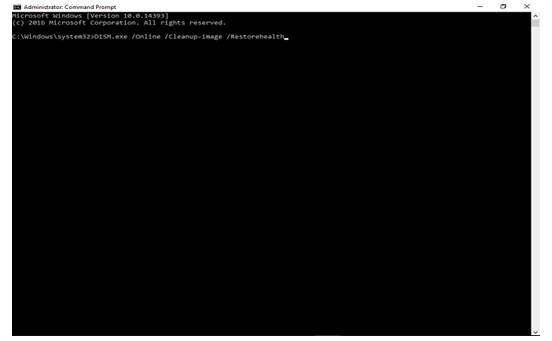
- Once the DISM find and repairs all the corrupted system files, you can restart your computer and try updating the PC with windows updates.
-
Delete Some Relevant Files
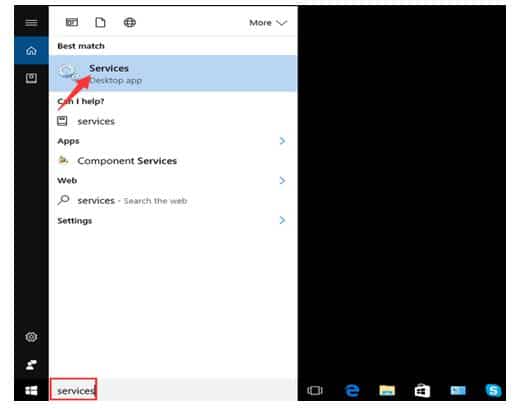
- In the “Cortana”, type the “Services” and in the pop-up that appears on screen, click on “Services”.
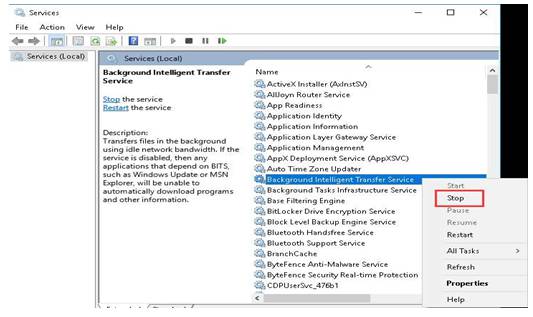
- Find and right click on the option “Background Intelligent Transfer Service” and now in the context menu that appears, click on “Stop”.
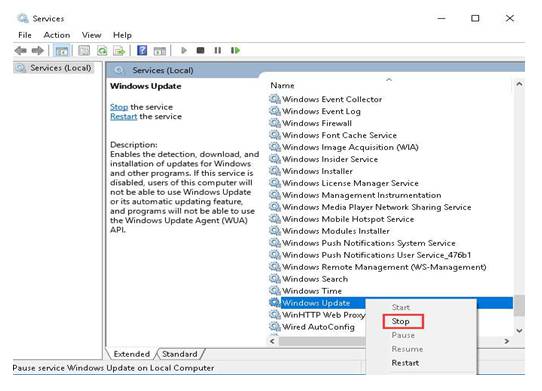
- Next, locate and right click on “Windows Update” and select “Stop” from the context menu as shown in the below picture.
- Now you need to open the “windows explorer” and then go to the path given here “C:WindowsSoftwareDistribution” without using quotes.
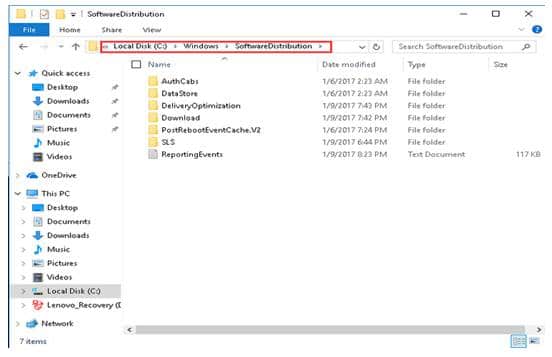
- Next, you need to delete all the contents of that folder.
- There is a chance that some of the files are not deleted, in this case, you need to go to the Windows update step again and perform it.
- Make sure to delete “Download” and “DeliveryOptimation”.
- Finally, restart your computer and see that the error is resolved or not. If the error persists, use next fix.
-
Check the Integrity of File using SFC Tool
There are chances that sometimes, after the upgrade of the system few files would be corrupted. In this case, you can scan for those files using the SFC tool and see that the problem will be fixed.
- Right-click on the Start Menu of the Desktop and open the command prompt as Admin.
- Once the command prompt opens, type the command “sfc/scannow” without using quotes and hit Enter from Keyboard.
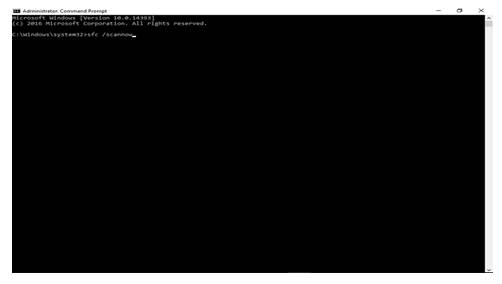
- The process will take sometimes, so you need to wait for the process to scan and repair the corrupted files.
- After few minutes, once the process is over you can check for the error. If it persists, you can make use of another solution given here.
Users are also advised to perform this scan occasionally when the overall performance of the system is decreased or when the updates are slow.
-
Disable Windows Defender Temporarily
If the above solutions do not work, you need to turn off the Windows defender with the help of below-given steps.
- Next, to the Start Menu of the Windows icon, click on “Search” window and type “Defender” in it.
- When the window “Windows Defender” opens, tap on “Settings”.
- Now, you need to switch off the option “Real-time protection” by tapping on “on-off” toggle.
- Also, switch off the option “Cloud-based Protection” by tapping on “on-off” toggle.
- Now close the settings window of the desktop.
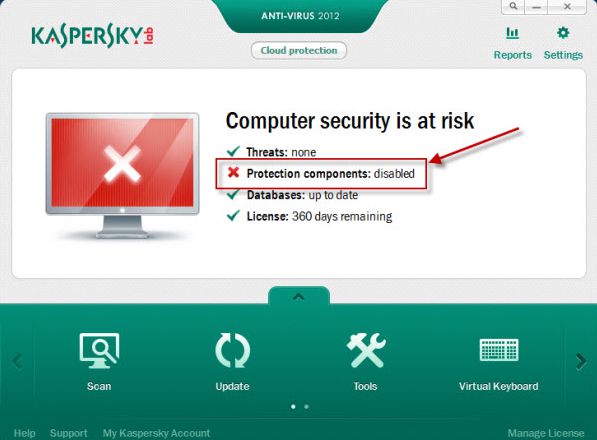
- The Windows Defender window app now should appear in “Red” color as shown below.
Now, you need to go to the third method given here and do it. With that, your Windows updates will be successfully installed on your PC. Once after fixing the issue, you can turn on both real-time as well as cloud-based protection “ON” for enabling the Windows Defender again.
-
Perform Clean Installation of Windows 10
If any of the above-listed methods does not work out, you need to back up your system and need to start a fresh installation. As said, the error occurs when the users upgrade directly to Windows 10 without performing the clean install you need to do it now. So, it is necessary for the users to now perform the clean windows 10 installation.
-
Perform Clean Boot and Install Updates Again
Performing clean boot allows the users to start windows without the non-Microsoft services. This helps in identifying the applications or programs that are causing this problem. In order to fix the issue, you can clean boot the PC as follows.
- Click Windows + R buttons at a time to open the run box.
- Type “msconfig” in the run and tap “OK” and this will open the “System Configuration” dialog box.
- Under the “General” tab of the system configuration and under “Selective startup”, unselect or uncheck the box present besides “Load startup items” and then tap on “Apply” button finally.
- Now again in the system configuration window, tap on “Services” tab and check the checkbox beside “Hide all Microsoft services” and tap on “Disable All” button as shown in below image.
- Finally, click on “Apply” and then on “OK” buttons.
- Reboot the PC and enable back all the disabled services after finding the actual problem.
If any of the methods listed here does not work out, perform the system restore finally and this could fix the windows 10 update error 0x800705b4.
Hope, any of the solutions given here can help resolve the error and you could get the windows updates successfully to your Windows 10 OS without any further issues. Stay in touch with us with your valuable comments and more solutions if any for fixing this error.
