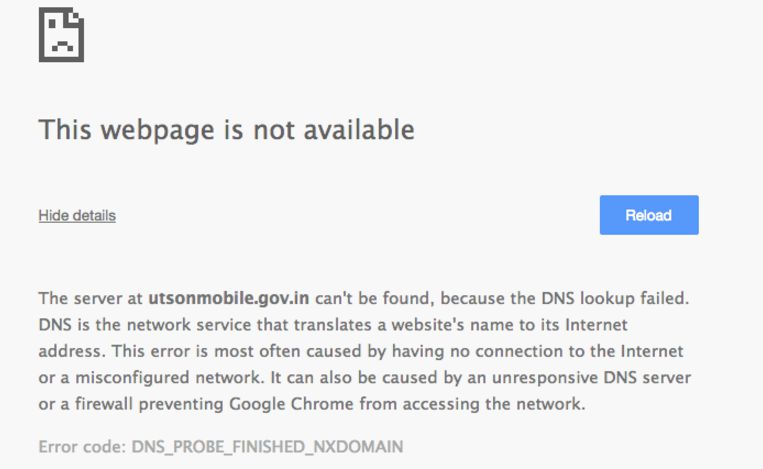
Network connection errors in the Google chrome is the most common thing and fixing them manually is somewhat tricky if you do not have proper understanding of the problem and the right solutions to fix the error. Recently, users have reported about the error dns_probe_finished_nxdomain which is rising constantly.
What is this error and how to fix this error is the question that they raised. In order to sort out this issue, we have come up with the details of this error here clearly.
DNS_PROBE_FINISHED_NXDOMAIN is a Google chrome error that will prevent one from accessing any of the websites raising the problems such as connecting with the services outside.
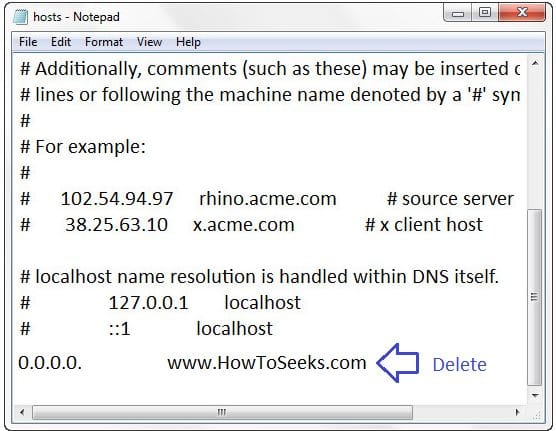
It is a DNS error and this mainly occurs when the system can’t translate or resolve the address / names. This error can also be because of the wrong entries in the file of the host as it prevents or else gives the limited access to few websites or all the websites.
So if you are exploring best free streaming sites or any thing else and facing this issue then lets talk about What is Dns_probe_finished_nxdomain? and solve error.
How to Fix DNS_Probe_Finished_Nxdomain
There can be several other reasons for this error to occur. But don’t worry as it is a temporary error and with few simple solutions you can fix this error without having to call for the support. So, better read the complete post to find out the solutions and get the best methods to solve the error as early as possible.
-
Change the DNS Address
When the DNS server is having the issues, there may be a chance that this error occurs. But, with the help of the different DNS server, you can easily fix this issue. Here we are showing the process on how to use the Google’s Public DNS server as your DNS server.
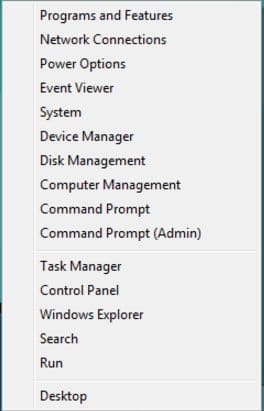
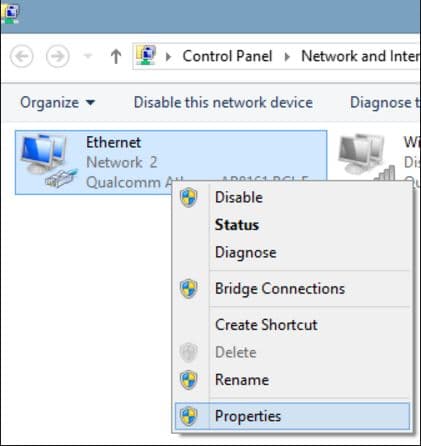
- Press the buttons Windows along with X and choose the option “Network Connections” from it as shown below.
- Now a window will open from which you need to look for the Network connections available in it.
- Right-click on the network connection you are using and select “Properties” from the menu that appears.
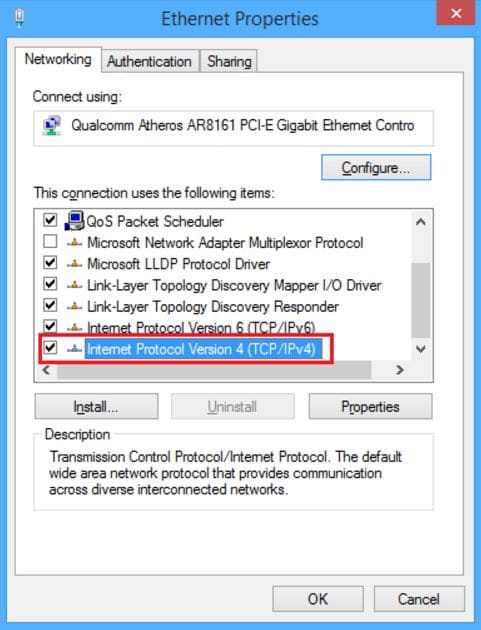
- Next, a pop-up will appear from which you need to choose “Internet Protocol Version 4 (TCP/IPv4)” and tap on the button “Properties”.
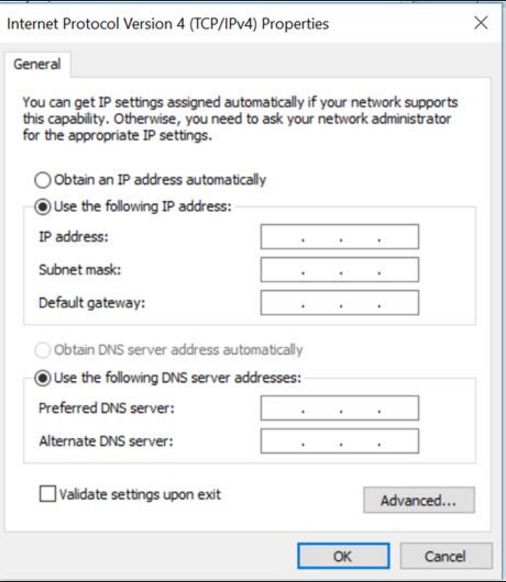
- Now, choose the option “Use the following DNS server addresses” and enter 8.8.8.8 as the preferred DNS server and as the alternative DNS server enter 8.8.4.4. Finally, tap on the “OK” button and that’s it the DNS address is changed successfully.
-
Flush the DNS
This is one of the easy methods to fix the error dns_probe_finished_nxdomain. You just need to run the flush command to solve the error through the command prompt. You can do it in the following way.
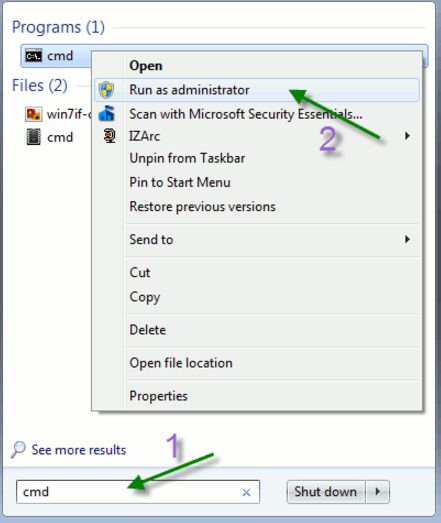
- Click the Windows + R button from your keyboard.
- Now, the run box will appear on the screen in which you need to type “CMD” and press the enter button.
- You can also press Windows + X and select Command Prompt (Admin) option from the menu.
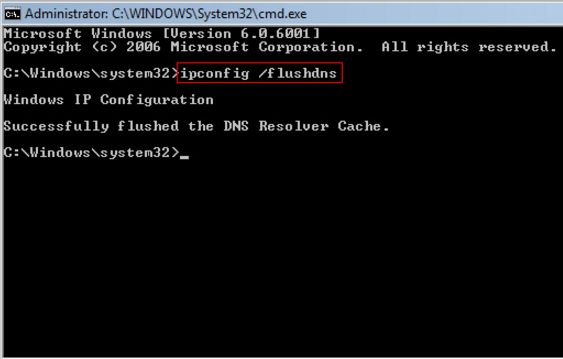
- Now, the command prompt will appear on the screen. You just need to run the command “ipconfig /flushdns” by clicking the enter button as below.
- Once the command is executed and the process completes, you can close the command prompt and check if the problem goes off. If the flush command does not work, you would have to run the following commands in the following way.
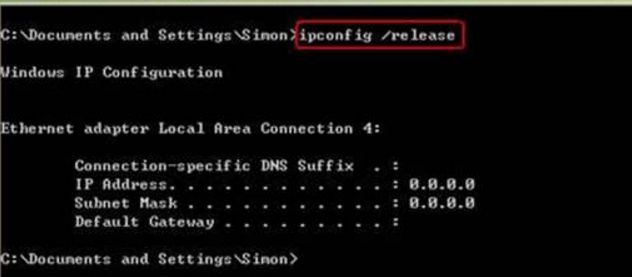
- Type the command “ipconfig /release” and tap on the Enter button.
- Now enter the command “ipconfig/all” and press the button Enter.
- Type the command “ipconfig/flushdns” and hit Enter.
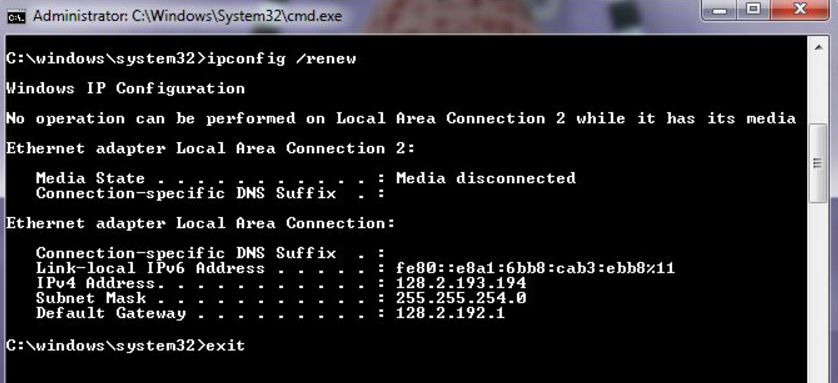
- Type the command “ipconfig/renew” and click Enter.
- Another command that you need to enter is “netsh in tip set dns” and click on Enter.

- The final command that you should type is “netsh winshock reset” and tap enter.
- Finally, restart your PC and check if your network connection is working properly. If not go with the next solution.
-
Disable the VPN Software Temporarily
In order to protect the online privacy, lots of people were using the VPN software. Though the clients of the VPN are very useful sometimes they lead to some problems with the DNS.
In order to fix this issue, the users have to disable the VPN client and see that the problem is fixed now. Even after disabling the VPN if the error does not get solved, you have to disable the VPN software temporarily from your computer and see if the error is resolved finally. Hope this will fix the issue sometimes.
-
Reset All Features to Default in Google Chrome
Some experts have reported that resetting all to the default would sometimes solve the issue and it worked out for many. This is a very simple process and you can do this, you just have to do the simple steps as stated below.
- Open the Google Chrome browser from your system.
- Type the command “chrome://flags/” without quotations in the address bar of the Google chrome and click on the Enter button.
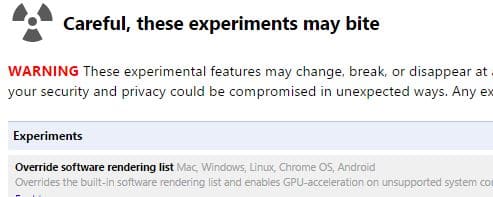
- Now, a page will appear from which you need to click on the button “Reset all to default” at the right side.
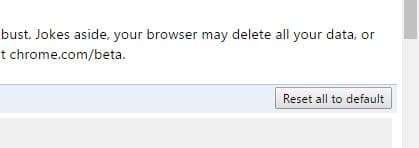
- Finally, re-launch the Google chrome and see that the issue is resolved by trying to load the webpage again.
-
Restart DNS Client Service
Sometimes restarting the DNS client service can solve the issue. So, do it in the following way and check if the issue is resolved.
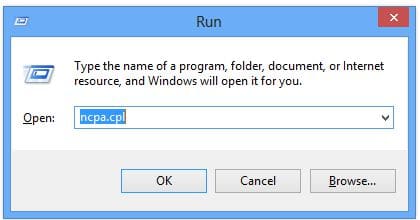
- Hit the buttons Windows along with R and enter “services.msc” in the run box that appears on the screen and which is as follows.
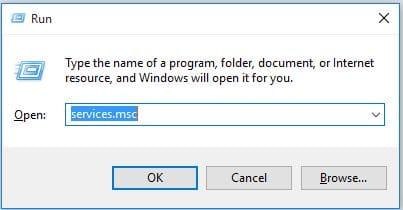
- After that click on the “OK” button in the run box.
- Now, a Services window will appear on the screen. You should find the “DNS Client service” from the window and right click on it. Select the “Restart” from the menu that appears now. You can see the below-given picture to do this.
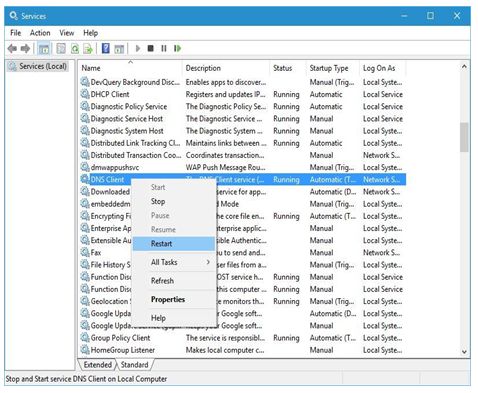
- With this, your DNS restart will start and once the DNS restart completes, you can close the services window and see if the problem with the chrome is solved and you could be able to open the web page you want from the browser.
All the above-listed methods would probably solve the problem with the Google Chrome and help you get rid of the error message. If not, you can do other simple methods give below and check if the issue does not arise.
-
Uninstall Websites Filtering Software If Any
If you are using any of the website filtering software’s on your PC that could be reason for the error as the software might filter the websites that are problematic and block them from opening. In this case, you just need to disable the software for some time and check if the error does not appears or otherwise you can simply disable that software to not see the error message again on the screen.
-
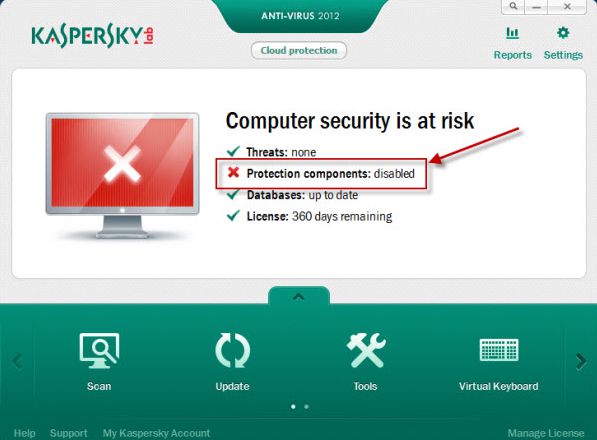
Disable Firewall / Antivirus Software
There is a chance that sometimes, the antivirus software of firewall can cause these network connection problems. To get rid of the issues in this case disable the antivirus if you are using any and try to browse the websites you wanted to open and getting the error.
If the issue is solved, you can try to reinstall the antivirus software. After installing the software if the error returns back, this could be the reason for error probably and you need to permanently disable or uninstall it and install any other antivirus or the firewall software that does not cause these types of issues.
-
Unplug the Router and Computer from Power Source
It is always better to unplug the computer from the power supply and leave it at least for 5 minutes if this type of errors occurs on your PC and plug it back. Make it as the first option if necessary as sometimes doing this can solve the error simply.
You can also do the same with your router and ensure that the memory has been cleared and residual charge is released off and plug-in back to the power cable. Now, try to open the websites in your Chrome browser and see the error has gone out.
-
Other Solutions
Other simple fixes that you can do with your computer are as follows.
- Some users have reported that updating their Network Driver has solved the issue completely. So, it is better to update the network driver. In order to update better download the latest update from the manufacturer’s website and install it as updating directly from the device manager could not work properly sometimes.
- Deleting the browser data such as browser cache, browser cookies from your Google Chrome browser may help you to get rid of the problem. You can also try deleting the browser data from the other browsers too and open the website you want.
- Deleting the browser data from the Chrome is very simple, you just need to tap on the “History” option from the three lines at the right side of the Google Chrome and tap on the “Clear Browsing Data”. Now in the pop-up, set “the beginning of time” from the dropdown menu, check all those you want to delete and again tap on “Clear Browsing Data” button at the bottom of the pop-up. This will clear all the data, cookies and cache from your browser.
Any of these simple fixes could work out certainly and you can get rid of the error further. All these are the best solutions available till now and one can try to fix the error DNS_Probe_Finished_Nxdomain if they are facing the issues with it.
Hope, this guide will help you. You can ask questions about server dns address could not be found. dns_probe_finished_nxdomain also this webpage is not available dns_probe_finished_nxdomain for more information.
fix err_connection_refused chrome Error
Fix irql_not_less_or_equal windows
Http Error 503 The Service Is Unavailable