Hope you are searching for how to make bootable pendrive for windows 7 and Windows 8.1,10 don’t worry you are landing on right place of the internet.
The people who make use of electronic gadgets in their day to day life might have some knowledge about operating system and Pendrive. For any device, operating system acts like a heart and without the OS, we cannot operate the device in a proper way.
If in case, your OS has crashed or some malicious virus attacked your device then, you will format your device. The next step is to install a new operating system on your PC or Laptop. In order to do so, the users require a CD, DVD or a Pendrive.
The users can easily install any OS using these sources. In general, flash drives or Pendrives are extremely faster that helps users to transfer their data. Also, the Pendrives aids you in installing the OS at a faster rate on your device.
Contents
How to Make Bootable Pendrive with 3 Ways
There are different methods that help the people to make a Pendrive bootable. You can make bootable Pendrive so as to install the latest version of Windows 7, 8, 8.1 or 10 operating system versions on your PC or Laptop.
We have compiled a list of all the possible ways to make bootable Pendrive. Check out the detailed tutorial from the below post.
Requirements
The users need to have some things so as to make bootable Pendrive. We have listed out all the essential requirements that you need so as to make bootable USB.
- The size of the USB or Pendrive must have more than 4 GB.
- No need of CD or DVD.
-
Make Bootable Pendrive using Command Prompt
Check out the easy steps that help the users to make bootable Pendrive using Command Prompt.
- First of all, you have to insert your 4GB or more USB flash drive or Pendrive on your Windows PC.
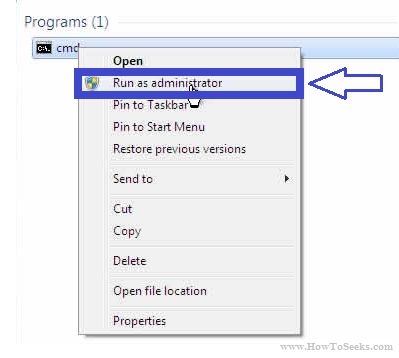
- Now, you need to open Command Prompt on your Windows device. You need to run it as an administrator.
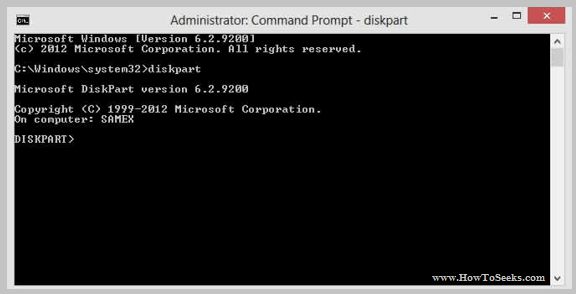
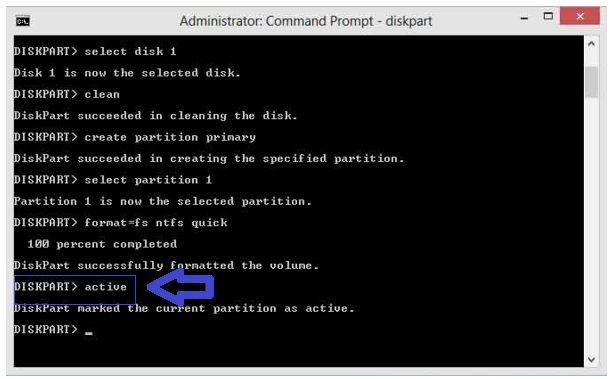
- Enter ‘diskpart’ in the command prompt.
- A new command line window i.e., Disk Management Utility’ will open so as to find out the USB flash drive number.
- Enter ‘list disk’ in the command prompt. You can then see a list of disks available on your device.
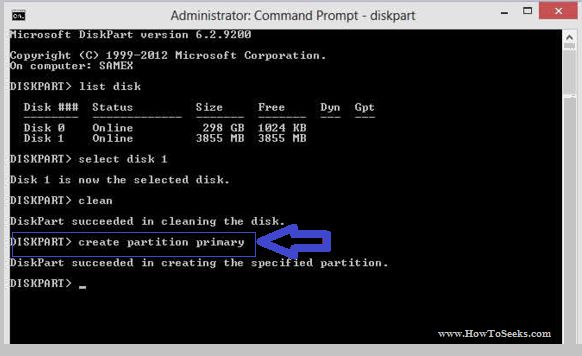
- When you find that your Pendrive also listed on the window, you need to remember the disk number next to it.
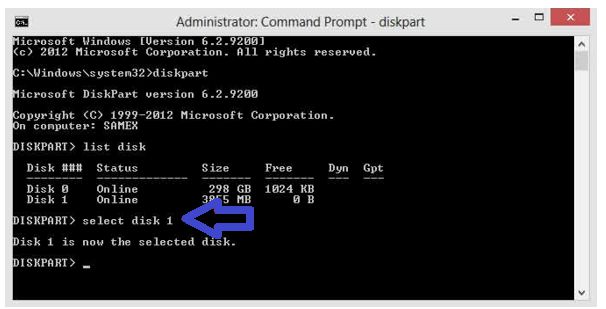
- Type the command as select disk # (# refers to the disk number of USB drive).
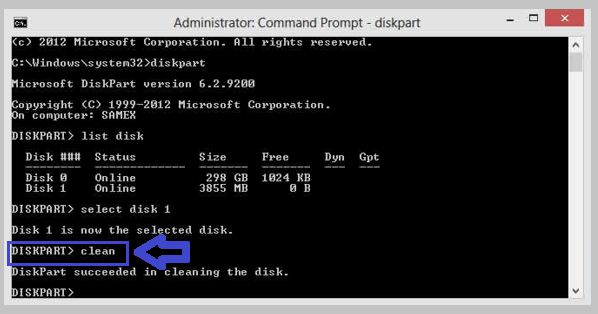
- Enter clean in the command prompt so as to acquire the disk management utility.
- You need to completely erase the whole data on the disk.
- Type ‘create partition primary’ and you can then see a message that says ‘Diskpart succeeded in creating the specified partition.’
- Enter select partition 1 and hit enter. You will then get a confirmation message saying the disk as active.
- Once the disk activates, you can further format the Pendrive.
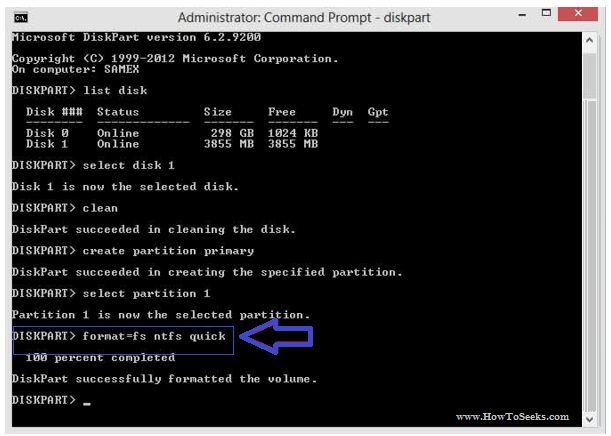
- Give the command as format =fs ntfs quick and hit enter.
Note: If your OS is compatible with Unified Extensible Firmware Interface (UEFI), you need to format the USB flash drive using FAT32 instead of NTFS. For that, you need to enter format fs=fat32 quick, and then hit ENTER.
- After successfully completing the format process, you can see the message on the command prompt.
- Type ‘active command and then exit so as to end the disk management program.
- After booting your Pendrive, you need to copy the installation files of your Windows OS that you wish to install.
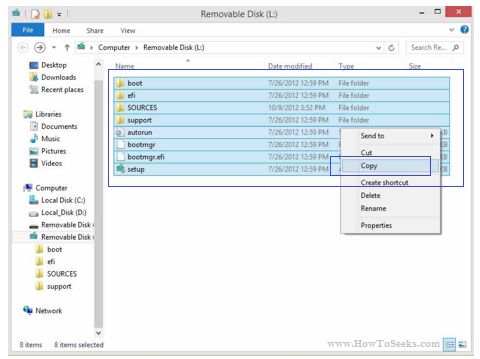
- Just drag and drop the files into the USB.
- After completing the booting process, you can insert the USB drive to your device so as to start installing the OS.
- You need to restart your device. When BIOS screen displays, you need to press the F12 key and choose the options to boot.
- From the options, you need to pick Pendrive and hit enter.
That’s all! This is the easy process that helps the users to make bootable Pendrive using Command Prompt on your Windows PC.
-
Bootable Pendrive using Software
Another best method that helps the users to make bootable Pendrive is by making use of some software tool. Rufus is the best tool that aids the users in completing the booting process in a faster way.
Using this Rufus tool, you can boot Pendrive so as to install any of the OS like Windows, Mac, and Linux as well. Check out the easy steps to make bootable Pendrive using Rufus tool.
- Firstly, you need to download and install Rufus tool on your Windows PC from the web.
- The size of this Rufus file is very small i.e., about 1MB.
- After completing the installation process, you need to launch it.
- Plug in your Pendrive to your device and run the software on it.
- If your device is UEFI (Unified Extensible Firmware Interface) then, choose the partition scheme.
- Now, pick MBR Partition scheme for BIOS or UEFI computers.
- Just tap on create bootable USB. You can then hit the next button and choose NTFS.
- Make sure that the size of the cluster is 4096 bytes.
- You need to choose two passes and select quick format option.
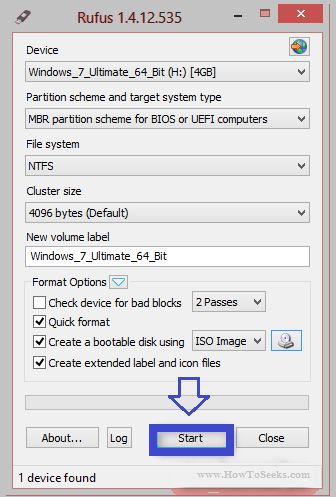
- You can then choose the ISO Image file and tick the checkbox of Create extended label and icon files.
- Hit the start button on the Rufus window.
- This process consumes some minutes to complete it. After the completion, your Pendrive is all set to install your Windows OS on your PC.
This is the easy method to make bootable Pendrive using the Rufus tool on your Windows computer or Laptop.
-
How to make pendrive bootable using WinToUSB
WinToUSB is nothing but Windows to USB. It is one of the best Windows creators that help the users to install and run any OS on some external storage device.
Compared to the above-mentioned methods, WinToUSB is the easiest way to make bootable Pendrive for free of cost. You need to make sure that the installation source is WIM/ESD/VHD/VHDX/ISO/SWM image or some other external device like CD or DVD.
Another way to install the OS is to copy the complete installation files of your Windows OS that you wish to install on your Laptop or PC. You need to copy the files of Windows OS to your USB flash drive. The WinToUSB Windows creator supports almost all the versions such as Windows 7, 8, 8.1 and 10 operating systems.
The WinToUSB creator offers the best user interface for all the users so that they can easily navigate through this Windows creator with much ease. You can easily install or boot the USB drive using this tool. This tool supports both VHD-based and VHDX-based workspace for your Windows device.
Conclusion
Hope this howtoseeks.org post you will enjoy. In short, bootable Pendrive much better compared to a bootable CD or DVD. If you are seeking to make a bootable Pendrive, we are here to provide the best support for you guys. In this tutorial, we have come up with a simple yet detailed procedure to make bootable Pendrive.
These are the simple methods that aid the users in making bootable Pendrive on your Windows 7, 8, 8.1 and 10 Operating system versions.
If you have any question regard how to make a bootable pendrive for windows 10 or other then please tell us, We will try to solve your issue as well as soon possible.
