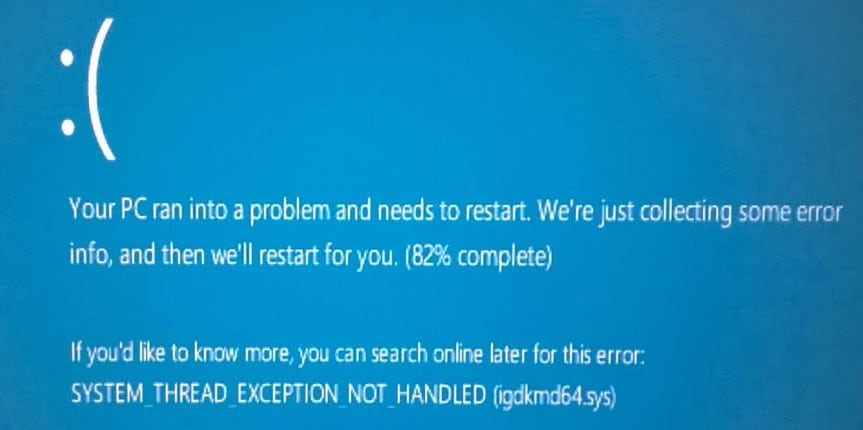
System Thread Exception Not Handled is a type of error that is seen on Blue Screen of Death (BSOD) which is seen mainly in the Windows 8, 8.1 and 10 versions of OS by the users.
This error occurs for some users after 10 to 15 seconds of the windows start whereas, few users have reported that they get their error immediately after the windows gets startup and during the system reboot.
This makes the users get stuck in the middle and that they can’t do anything with their PC. It is said that the error occurs because of malfunctioning driver.
The incompatible, corrupted or outdated driver can make your computer to show the blue screen with this error. The BOSD is caused not only by the outdated drivers but also due to overclocking software’s or the due to overclocked tweak that occurred recently.
Contents
How to Fix System Thread Exception Not Handled windows 10 Error
If you find that any newly installed software or driver is causing this error, then the very first thing that the users have to do is to uninstall those programs as they are not suitable.
Check for the updates of those programs regularly and try to reinstall them when the patch or update has been released for that program or driver. But, if the error occurs during system reboot or after the windows start, then here are the quick solutions for fixing the error.
Go through the following solutions to fix the issue in a very short span of time by yourself. So let us know about how to fix System Thread Exception Not Handled windows 10.
-
Check Display Drivers and Reinstall Them
One of the common reasons for the error to occur is the display drivers. So, all that you should do is to uninstall and reinstall the display drivers to the latest version. If the users can login into their Windows at least for few minutes, they can directly uninstall the display drivers and install them.
But if the users can’t even logon into the system, they need to boot their system in the safe mode as follows and then uninstall and reinstall the drivers.
Boot in Safe Mode:
When you boot in safe mode will disable all the services and drivers that are required for running the windows. Now, let us boot your Windows 8 / 8.1 / 10 OS in safe mode. To do this, you need to follow the below process.
- Turn your PC ON and do a force shutdown by pressing the power button hard.
- Turn the System ON again and repeat the same i.e., turning off and on i.e., till the system startup in the repair mode. The main aim is to trigger the computer to go to the advanced / repair mode.
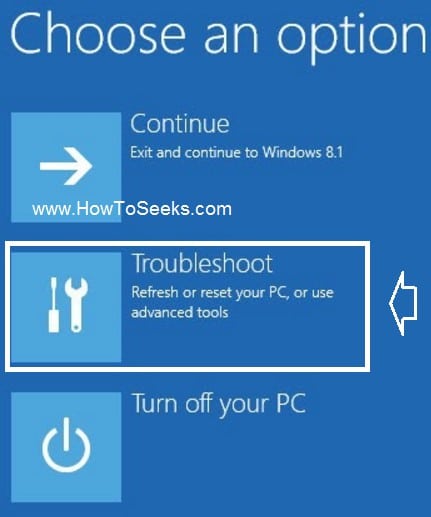
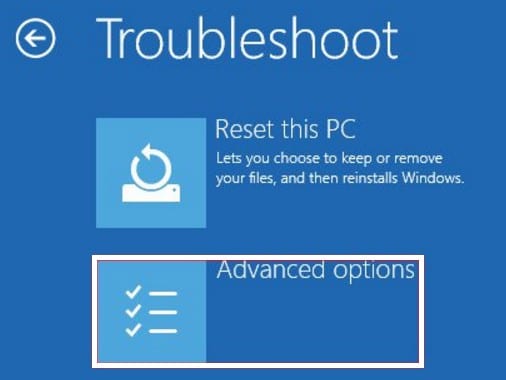
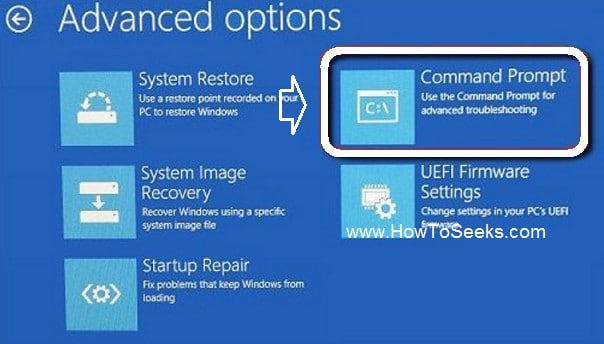
- Now, click on the option “Troubleshoot”, go to “Advanced Options” and under it click on “Command Prompt”.
- In the command prompt that appears on the screen, type the following command and click on the Enter button.
BCDEDIT /SET {DEFAULT} BOOTMENUPOLICY LEGACY
- Next, you need to restart your computer and keep clicking on the F8 button (Shift + F8) for some time i.e., till the windows logo appears on the screen.
- Now, you will get the menu “Advanced Boot Options”. Under it, you select “Safe Mode with Networking” option and click Enter button and with this, you will be running your Windows OS in safe mode.
-
Troubleshoot
-
Advanced Option
-
Command Prompt
If in case, you are not getting the recovery options or they are not showing up, you can do the following procedure.
- Get a CD or DVD or a bootable USB of 8 GB installation media of the Windows OS and also a computer with the internet facility.
- If you are using the CD / DVD, keep it in the CD / DVD drive of your computer or if you are using USB, place it in the USB drive of your PC.
- Now, you need to Power On your PC. Then tap on the “F2” button until you can access the Boot Menu. The button for entering into the boot menu will differ based on the model of the system. In order to know the button for your system, you have to check in your manufacturer website. Usually, for HP it is F9 and for Dell it is F12.
- Once you enter into the boot menu, select CD / DVD if you have instated CD or DVD in your PC or choose USB drive if you have used USB in your computer.
- If you are asked to click any of the keys in order to boot your PC from the media, you can do it.
- Now, the Setup screen of the windows will appear on the screen.
- Click on the “Next” button at the lower part of the screen i.e., at the time zone.
- Now you have to left tap on the option “Repair your computer” which is present at the bottom of the screen.
- Finally, “Choose on Option” will appear on the screen which is as shown in the above picture. From there you can follow all the above same steps to go into the safe mode of the Windows.
Check and Uninstall Display Drivers:
Once you complete the above process, you can follow the below steps to uninstall the display drivers.
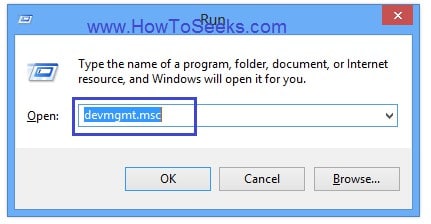
- Start with clicking on Windows Key + R.
- Now the Run box will appear on the screen.
- In the Run box, type “devmgmt.msc” and tap on entering button which is as shown in below picture.
- Now, you will get the “Device Manager” window on the screen.
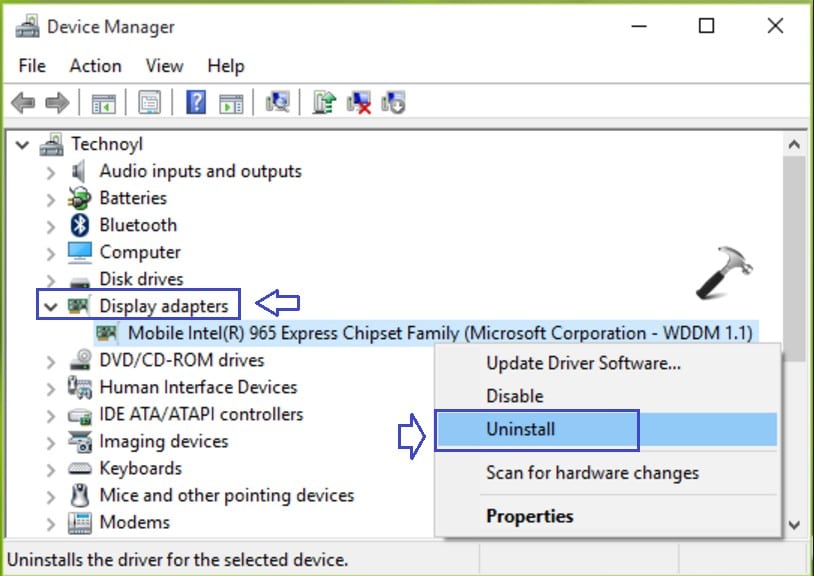
- Expand the “Display adapters” from the list of options present in that menu by double-clicking it.
- Under the Display adapters, the graphics card is installed.
- Right click on the graphic drive and select “uninstall” from it. Before that, you can write down the full name of your display driver.
- Now, click on the “Delete Software” from your computer and then tap on “OK” finally.
- Restart your PC normally.
- Once your system restarts, the video drivers will be automatically installed. If they are not installed or if you are having the same problem again, you can find the updated version of the drivers and install them manually in the following way.
Install Display Drivers:
- Visit the website of the Manufacturer to get the updated version of the graphics card drivers.
- Search for the model of the graphic card and download the latest drivers that are compatible with your windows OS as well as the based on the system type (x64 or x86).
- In order to know your OS type and System type, click Windows + R and type “msinfo32” command in it and tap on entering.
- Now System information window will appear on the screen. From there, you can note down both the System and OS type present at the right pan of the window.
- Based on the information gathered, you can download the latest version of graphic card drivers that are executable and simply Run them following the on-screen instructions.
If your system is not having installed with the external graphic card, then it will have the integrated display adapter which is embedded on the motherboard. In order to get the updated version of the onboard graphic adapter, you can visit the manufacturer website of the motherboard you are having.
Along with OS type and System type collect the System model from the System information which will be available by typing the msinfo32 command. Now, download the executable latest version of onboard graphic card/adapter and run it with the help of the instructions that come on the way. With this, reinstallation of the display drivers will be completed. You can finally restart your PC and check if the error is fixed after some time.
-
Rename the Faulty / Corrupted Driver
This is another method to fix the error. Next to the System Thread Exception Not Handled error in the brackets, you can see tikmdag.sys, nvlddmkm.sys, etc. as shown below. Renaming the faulty driver which windows cannot find will fix the error as it obtains the new replica of the driver file. Do it in the following way.
- Go to the command prompt by pressing Windows + R and typing cmd in the run box.
- In the command prompt, enter the following commands one after the other by clicking enter button after each command.
- c:
- dir
- In the result, the dir command will show up a folder with the name “Windows” which is the target drive. If it does not show up, type “d:” without quotes and click on Enter.
- Now, enter the following given command and click Enter button after each command.
cd windowssystem32drivers
ren driver name.sys driver name.old
- In the above command, driver name you should give is the name of the culprit / faulty driver i.e., for example, atikmdag.sys.
- Now, you can restart your PC and the driver that has been deleted now will be installed again automatically.
- If it does not happen log on into the normal mode and clicks Windows and R.
- Enter “devmgmt.msc” without quotes in the run box and click OK.
- Right-click on the uninstalled device drive which is shown in yellow exclamation mark and tap on “Update Driver Software”.
- Next, you need to tap on “Search automatically for Updated Driver Software” in which windows will be searching for the driver in the online and once you find them, you can install it.
These are the two best methods to fix the error “System Thread Exception Not Handled” in Windows 8 / 8.1 / 10 OS. If you are having the same error, do follow any of the methods and fix the error of system_thread_exception_not_handled windows 10.
Give me any feedback to improve this windows 10 system thread exception not handled post as well to make more informative.
- Microsoft Compatibility Telemetry
- Fix err_cache_miss error
- Fix err_connection_reset Chrome
- Fix ERR_SPDY_PROTOCOL_ERROR