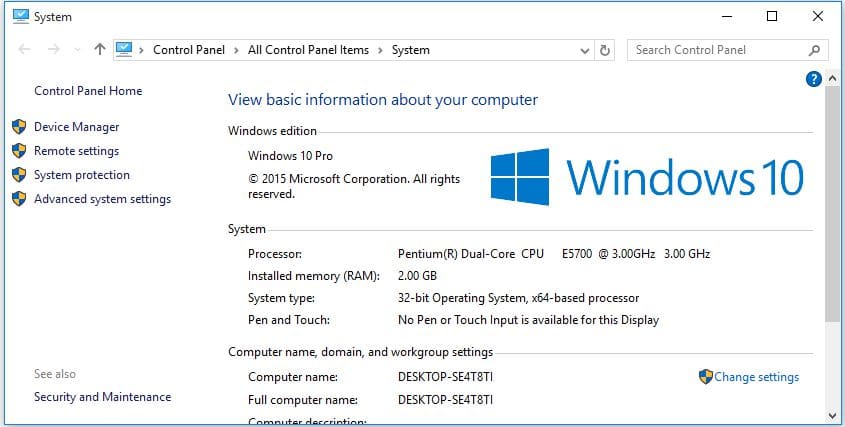
What are system and compressed memory is said to be a process which is accountable for the different functions that are related to the system as well as the memory? It is mainly responsible for the compressions of folders, files and for the RAM management.
If you are windows 10 users you have come across the issue that, the System and compressed memory is using more CPU. The system and compressed memory disk usage on an average are thought to take only the small amount of the CPU.
But, it is reported in many cases that, this process is starting up by using the 100 of the user’s disk by making their computers very slow and also delays the roles as well as responsibilities of the other tasks and processes running on the system.
All though at starting the problem came lightly it is distributing more and more. There can be one or two reasons for the System and compressed memory to start using 100 of the disk or 100 disk usage windows 10.
Contents
- Solutions to Fix system and compressed memory 100 disk usage windows 10 memory High CPU
- Scan for the Viruses in Computer
- Repair any Corrupted Files
- Disable the Fast Start-Up and Hibernate
- Set Paging File Size of All Drives to Automatic
- Set PCI Express Link State Power Management to Maximum Power Savings
- Disable the System and Compressed Memory Process Both Together
- Turn Off Windows Tips Notifications
- Disable Superfetch Service Using Registry Editor
- Disable the Superfetch service from the Services manager
- Uninstall Graphic Adapter’s Drivers
- Kill the Speech Runtime Executable process
- Check if the RAM of computer is Failing or Failed
- Optimize Visual Effects of Computer for Best performance
- Verdict on 100 disk usage windows 10
Solutions to Fix system and compressed memory 100 disk usage windows 10 memory High CPU
One reason can be that the process is going simply out of control and the other is you would have messed all around the settings of the virtual memory and would have changed the file size of the paging to a set value from the automatic. But, the Windows 10 users don’t have to worry about this issue as there are possible solutions to fix the problem and some of the useful solutions are listed below for windows 10 100 disk usage or windows 10 disk usage 100 guides.
-
Scan for the Viruses in Computer
The malware or the viruses present in the computer can cause the system and compressed memory windows 10 for using the high CPU. So, before you start doing any troubleshooting for solving the issue you have to scan for the malware or the virus with the help of the malware or virus program on your computer.
If you are not having the antivirus program download one such good antivirus program for your PC and scan and remove any virus or malware from your computer.

-
Repair any Corrupted Files
If there are any files missing or corrupted in your computer you have to repair them. To know which files are corrupted and to repair them, you can make use of the softwares like reimage plus. You can download the software for your PC and run it to scan and remove the corrupted and missing files on your PC.
After that, you need to check if the windows 10 system and compressed memory are still using the high CPU or not. If the problem is not fixed, go for next solution.
-
Disable the Fast Start-Up and Hibernate
In order to disable them, one can just go through the below-given steps and do the same.
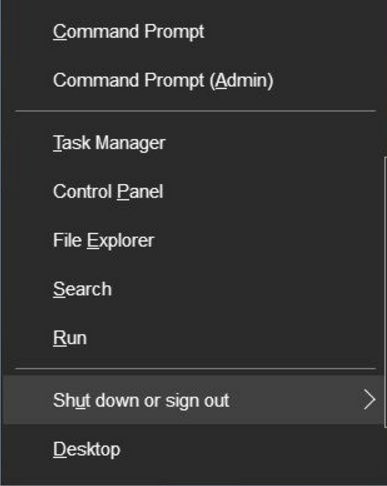
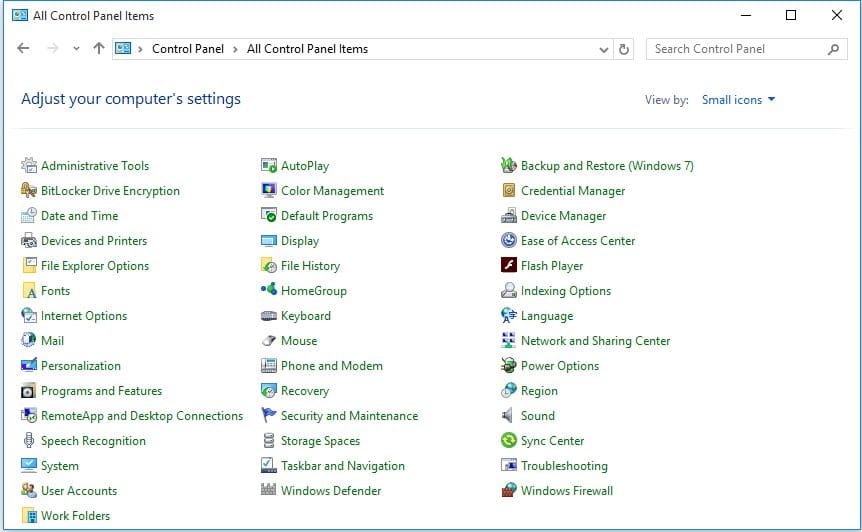
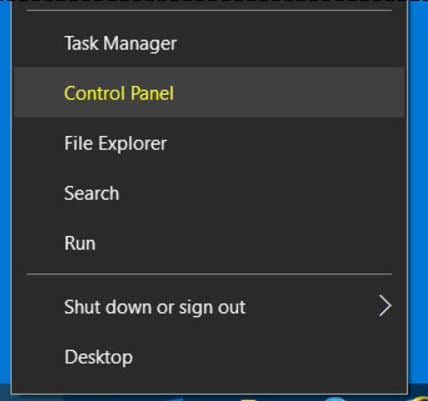
- Right click on the start menu of your computer and then select the control panel from it as shown in the following picture.
- At the top right corner of the window that appears on the screen, change the view by to the small icons and then tap “Power Options”.
- In the left pane of the window, select “Choose what the power buttons do”.
- Now tap on the option “Change settings that are currently unavailable”.
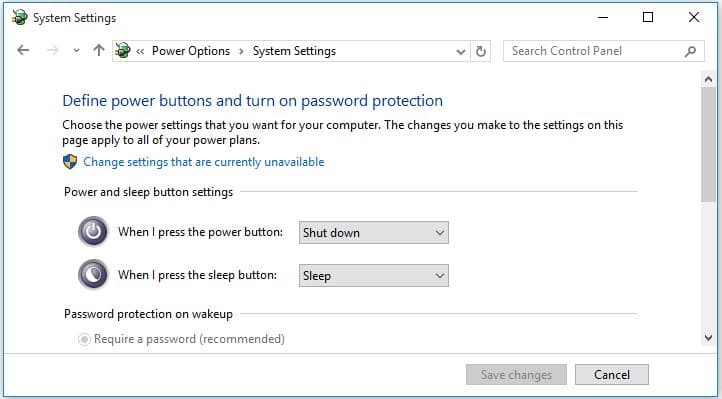
- Another window now appears in which you need to scroll down and unselect the checkbox with the option “Turn on fast startup (recommended)” and then tap on the button “Save Changes”.
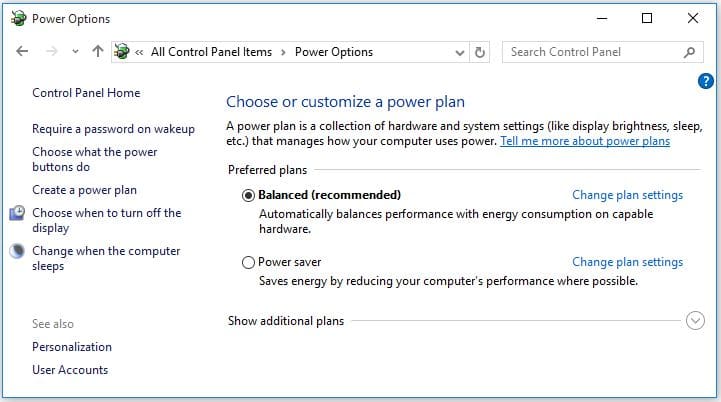
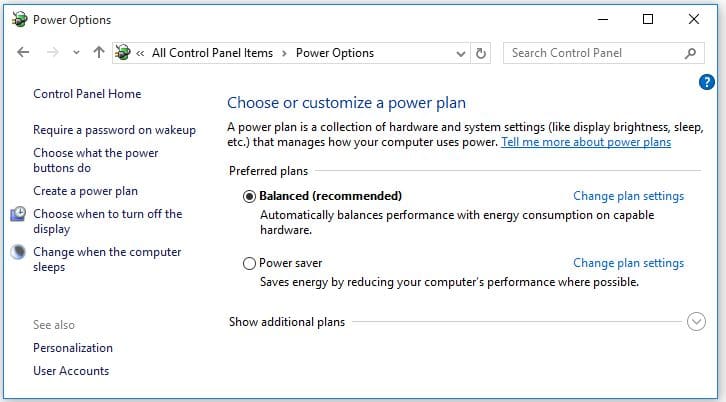
- In the window of the power options that appear on the screen, choose “Change Plan Settings” which is as shown in the below picture.
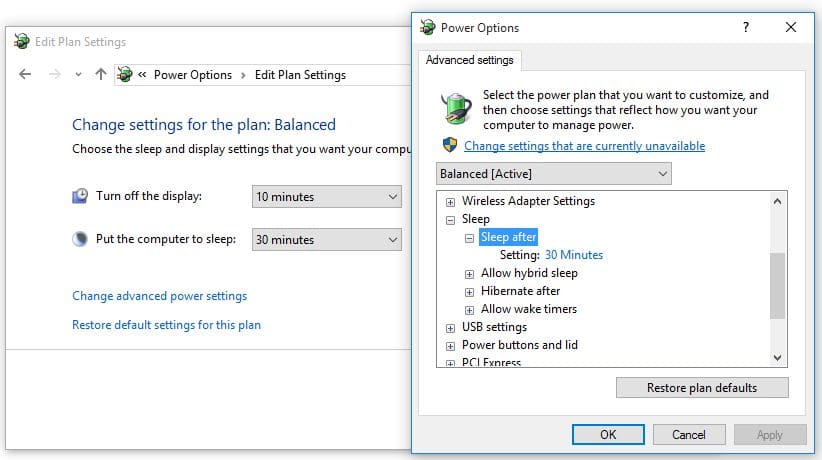
- Now tap on the “Change advanced power settings” through which the power options window will appear. Expand the option sleep from there and set the options Sleep after as well as Hibernate after to Never.
- Finally, click on the “OK” button and restart your PC. Once the PC restarts seen whether System and Compressed memory is using high CPU. If the issue still exists, go to next solutions.
-
Set Paging File Size of All Drives to Automatic
In Windows 10, the paging file size for all the drives is set to allow the windows for automatically managing it by default. The user can set the custom value for the paging file size but if you do this some issues can arise with the compression of memory in the windows which leads to 100 CPU usage by the system and compressed memory high CPU. So, in past, if you have done this and suffering from the issue of high disk usage, then we a solution for it and this is as follows.
- From the desktop of your Windows 10 PC, open the “Start Menu”.
- Go to the “Settings” and search for the option “Performance”.
- In the search results, click on the option that is named as “Adjust the appearance and performance of Windows”.
- Now the “Performance Options” windows will pop-up on the screen. From there, go the “Advanced”.
- Under the “Virtual Memory”, you need to tap on the “Change”.
- Now, the users can see the Virtual Memory window on the screen. From the window, the users need to ensure that the checkbox beside the option “automatically manage paging file size for all drives” is checked or selected which means that the option has been enabled.
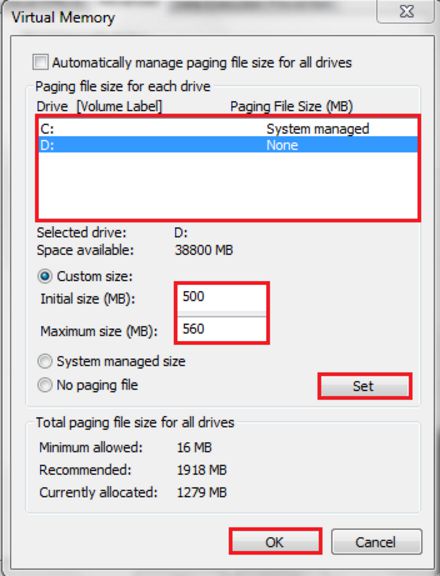
- Finally, click on “OK” button.
- Again in the Performance Options Window, tap on “Apply” and then on the “OK” button.
-
Set PCI Express Link State Power Management to Maximum Power Savings
- Go to the Control Panel of your Windows 10 PC.
- In the Control Panel, go to “Change Plan Settings” followed by “Change Advanced Power Settings”.
- Scroll down and locate the Setting “PCI Express” and then expand it.
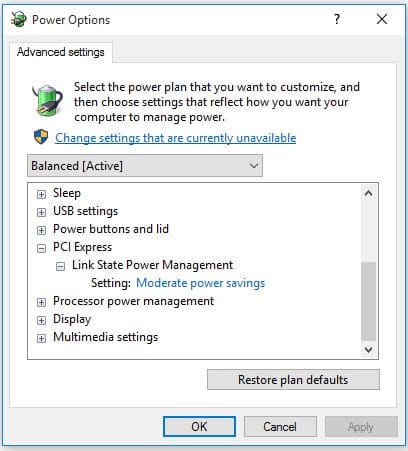
- Now you need to set the “Link State Power Management” to the setting “Maximum power savings”.
- Finally, click on “OK” button for applying the settings.
- Restart your PC and see if the problem is resolved. Otherwise, try the next fixes.
-
Disable the System and Compressed Memory Process Both Together
If you are getting the virtual memory window and have seen that the option “Automatically manage paging file size for all drives” is enabled already, then the paging file sizes of all the drives would not be the real culprit certainly. If so, in this case, you can directly fix the problem by disabling the system and compressed memory and the following steps will guide you to do this.
- Click on the buttons Windows and X both together.
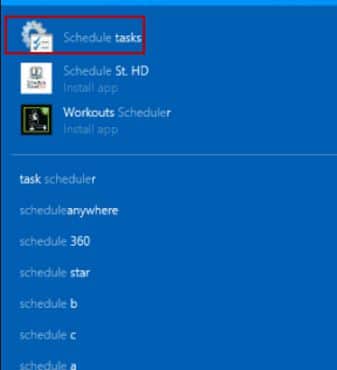
- Select the Control Panel from the options and then search for the “Administrative Tools and choose “Task Scheduler” option.
- Double tap on the “Task Scheduler Library” from the left pane of the Task Scheduler windows for expanding its contents.
- In the left pane of the window, double-click on “Microsoft” for expanding its contents.
- Also, double-click on the “Windows” in the left pane to expand the contents of it.
- In the left pane click on the option “MemoryDiagnostic” to have the contents of it displayed on the right pane of the window.
- Search for the “RunFullMemoryDiagnosticEntry” in the right pane and right click on it.
- In the contextual menu, tap on “Disable”.
- Finally, close the “Task Scheduler” and restart your computer. Once after the computer boots see if the problem still exists. If yes, try the next solution.
-
Turn Off Windows Tips Notifications
- Open the “Start Menu” of the windows.
- Go to the “Settings” and tap it.
- Select “System” from the Settings Window which is as shown in the below image.
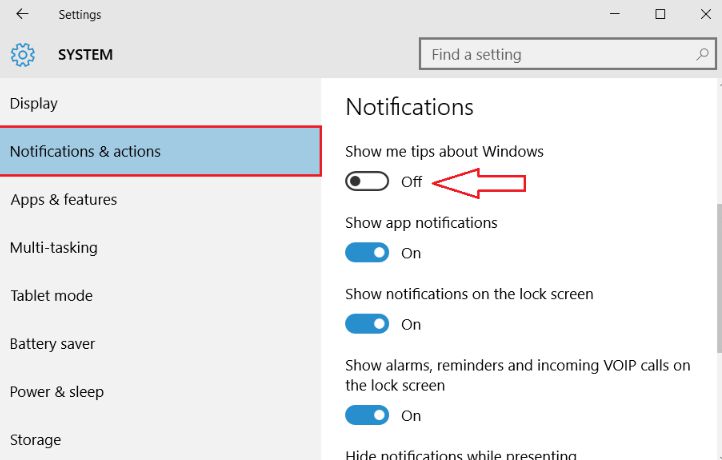
- At the left pane of the window select “Notifications & action” and the set the “Show me tips about Windows” under the Notifications in the right pane to OFF.
- Close the window and see if the problem with the System and Compressed Memory using high CPU is resolved. If not, try for the next solution.
-
Disable Superfetch Service Using Registry Editor
- Press the Windows + R buttons to open the Run box.
- In the Run dialog box that appears on screen, type “regedit” without quotes and click Enter button from the keyboard.
- Doing the above will launch the “Registry Editor”.
- In the left pane of the Registry Editor, go to the directory as follows.
HKEY_LOCAL_MACHINE > SYSTEM > CurrentControlSet > Control > Session Manager > Memory Management
- Under the “Memory Management” of the left pane of the Registry Editor, tap on “PrefetchParameters” for expanding its contents which will be displayed in the right pane.
- In the Registry Editor right pane, find and double-click on the registry value which is titled as “EnableSuperfetch” for modifying it.

- In the “value data” field of the EnableSuperfetch registry value, replace the value whatever it is with “0”.
- Click on the button “OK” and close the registry editor.
- With this, the superfetch service will be disabled.
- Finally, restart the computer and once the computer boots back see if the problem with the System and Compressed memory high usage of CPU is resolved. You can also disable the superfetch service from Services manager in the below-given method.
-
Disable the Superfetch service from the Services manager
- Click the button Windows logo along with R from your keyboard.
- Now, the Run box will appear on the screen in which you need to type “services.msc” without quotes and then click on “OK” button.
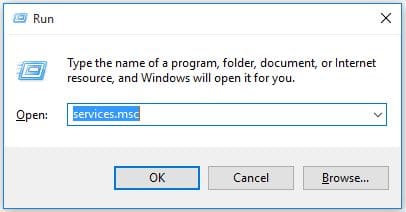
- The Services window will open now. Scroll down in the window, find and double-click on the “Superfetch” service.
- Tap on “Stop”.
- Set the Services “Superfetch” Startup type to “Disable”.
- Tap on “Apply” and then click on “OK” button.
- Close the “Services” Windows finally and restart your system for the changes to be applied.
Even after disabling the Superfetch service, if the problem still exists, do the following.
- After you reboot the computer, you need to disable all the start programs of the computer,
- On the desktop of your PC, press the buttons Ctrl, alt and delete altogether.
- Tap on the “Task Manager” from the menu and the window will appear on the screen.
- Under the task manager, select the tab “Start-Up”.
- Now, all the start up programs will appear on the screen. All that you need to do is, select all those programs that are unnecessary and “Disable” them.
-
Uninstall Graphic Adapter’s Drivers
- Check for the “Video Drivers” that are installed on your computer and “Uninstall” it.
- Restart the computer.
- Once the booting of the computer finishes, allow the windows to search and locate the appropriate graphics card driver which automatically gets installed on the PC.
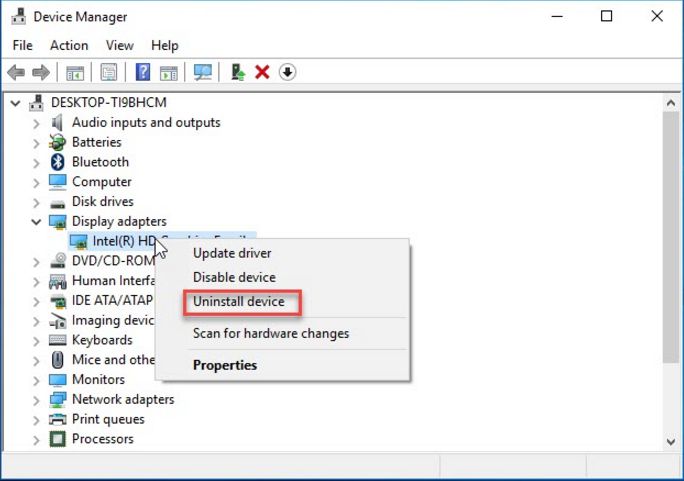
- Again Reboot the PC and check if the issue persists still. If yes, you have to uninstall the new version of graphic adapter drivers and install back the old version graphic card drivers and try the next solution.
-
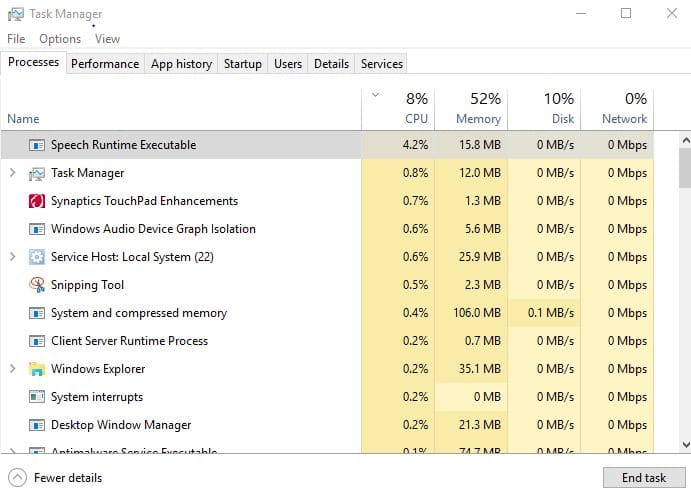
Kill the Speech Runtime Executable process
Some users have reported that the root cause of the problem is the process called “Speech Runtime Executable”. This is a system process which has to do audio recording via speech recognition or through connected microphones.
In this case, the Speech Runtime Executable process is said to be causing the System and compressed memory process for using up the obscenely huge amount of the resources of the computer and so the real culprit is the “Speech Run Executable” Process. Just by killing the process the problem will be resolved. Doing this is very simple and you can follow the below-given steps to solve the issue.
- Press the buttons Ctrl + Shift + ESC all together for launching the “Task Manager”.
- Under the “Processes” tab of the Task Manager, find and tap on the process that is named as “Speech Runtime Executable” for selecting it.
 0
0
- Finally, click on the “End Task”.
As soon as you end task, the problem existed with the system and compressed memory would reduce the memory consumption significantly if the “Speech Runtime Executable” process is the real culprit. As the Speech Runtime Executable is a system process, it would pop-up and quite very often. If it starts back occasionally and leads to the issue again, all that you have to do is repeat the above steps for killing the process.
-
Check if the RAM of computer is Failing or Failed
In many of the cases, the issue of consuming the high CPU is caused failed RAM or when it is failing. If it is the root cause of the problem, you just need to replace the RAM with the new one in the slot for fixing the issue.
If your CPU is having more than one stick of RAM, any one of the RAM would be faulty. In this case, replace one after the other restarting the computer back and check if the issue is persisting after replacing each of the RAM stick.
The faulty RAM stick will be one without which the computer does not suffer from the consumption of the high resource usage of the PC. It is a hard thing and it is impossible for the failed or failing RAM to cause the issue.
-
Optimize Visual Effects of Computer for Best performance
Some of the users have reported that, just by optimizing the computer Visual effects in their Windows 10 computer for the best performance with which the disk usage is significantly reduced from 100 to 0-25 immediately. One can optimize the computer’s visual effects in the following way.
- Right click on the button “Start Menu” for opening up the “WinX Menu”.
- In the WinX Menu, click on the “System”.
- In the left pane of the window, tap on “Advanced system settings”. Now, you will be asked for the action confirmation or the password. Be sure to enter the details asked.
- Go to the “Advanced” and under “Performance” tap on “Settings…”
 .
.
- Click on the option “Adjust for best performance” for selecting it.
- Tap on “Apply” button and then click on “OK”.
- In the “System Properties”, click on Apply and then OK.
- Close all the windows that are left out and reboot your computer to save the change. Finally, check if the problem remains again after rebooting the PC. Most probably, the issue of consuming high CPU by the system and compressed memory will be reduced.
Verdict on 100 disk usage windows 10
All these are some of the best solutions that we have come across in fixing the system and compressed memory high CPU or disk usage issue. If you are facing the same problem, do give a try to any of these fixes and get the problem solved manually in just a few minutes.
Even after trying any of the solutions, if the problem exists you have to take the support of the computer repair person and get the issue solved. Hope, this windows 10 100 disk usage fix guide will resolve the problem at its best.