WMI provider host which is also known as WmiPrvSE is a process of Windows Host Management which is used by some developers for the purpose of monitoring.
This type of behavior is observed in the Production Environment after the upgrade from windows 7 to windows 10. After that, lots of users have seen in increase in the usage of CPU that makes the system hot, lag and slow down.
It is supposed that the problem is raised because of the unusual behavior of that service that does not follow the patterns that it wanted to do.
There are some reports stating that the process of utilizing the computer will end using more than 50% of the power of the computer, particularly when it comes to the usage of media applications. Users can verify this issue through the Task Manager Process tab.
In order to solve the problem, users can reboot or Trouble Shoot the WMI service. By running some of the basic commands in the command prompt and restarting the Windows Management Instrumentation Service would fix the issue many times. So, do it in the following way and get rid of the issue.

Contents
What is wmiprvse.exe wmi provider host
What is WMI provider host high CPU usage? Before that, let us know what actually is WmiPrvSE.exe or what is wmi or the Windows Management Support service, so say it is a virus. Let us check about this. WmiPrvSE.exe is found in Windows/System32 folder,
But spyware would hide under this name and themselves places in any of the folders. In order to identify the possibility of this, the user has to check for the attributes of the record and also check it with the help of the antivirus program installed on your computer.
Users can also find the wmiprvse.exe windows 7 in the task manager with the outline as WMI Provider Host in it. Without this, any program in the windows that includes all the installed packages, system applications or any other programs cannot be maintained.
Related with it, WMI is said to be just a number which allows the management solutions for working properly. Even more, the users will not be getting any notification open on the occurrence of the error.
WMI provider number is Microsoft Windows OS element that is able to handle the business environment and it also gives the management information. So What does WMI provider host do? Its an acronym for Windows Management Instrumentation Provider Service
Fix WMI Provider Host High CPU in Windows 10
Through WMI, the managers can set up the problem information regarding the applications, system components, networks and also about the other enterprise components.
WMI Provider number is used by the individual developers for alerting the users of the windows when any major incidents happen. Do the any of the following best methods one after the other to solve the issue with high CPU usage by WMI provider host.
-
Repair Corrupted Files
At first, you can download and run the Reimage Plus software for scanning, repairing as well as to restore all the missing and corrupted files. You can follow the onscreen instructions for doing this. Even after repairing the corrupted or missing files, if the problem still exists you can try next solution.
-
Restart Windows Management Instrumentation Service
In order to Restart the Windows Management Instrumentation Service, users have to follow the below-given process which is the first step in solving the issue.
- At first, you need to open the Run dialog box. Open by pressing Windows key along with “R” button from the keyboard.
- Type the command “services.msc” in the run box.
- Now the service console will open from which you need to search for the “Windows Management Instrumentation Service”.
- Tap on any of the services and then click “W” key from the keyboard for getting all those services that will start with the word “W”.
- Finally, select “Restart” in order to restart that service. Allow it to run and check that the high CPU usage by the WmiPrvSE decreases. If not, you can try fixing the issue with the next method.

-
Restart Other Associated Services
If any of the above two methods did not work out, you can restart all the other associated services to fix the issue. You can do this in the following way.
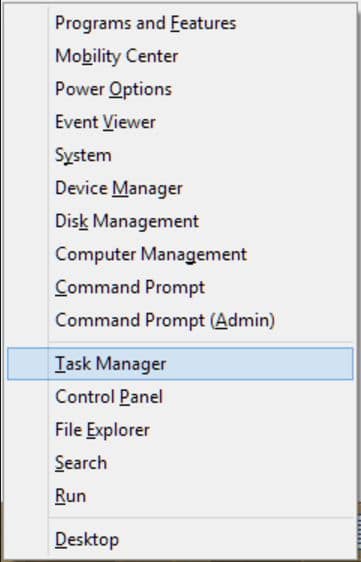
- Move the mouse pointer to the bottom left corner of the screen i.e., near to the Start button and right click on it. Now, a Contextual will be opened from which you need to select the “Command Prompt (Admin)”.

- In the command prompt, you can type the following command one after the other and press, Enter button after each command as shown in the below figure.
- net stop iphlpsvc
- net stop wscsvc
- net stop Winmgmt
- net start Winmgmt
- net start wscsvc
- net start iphlpsvc
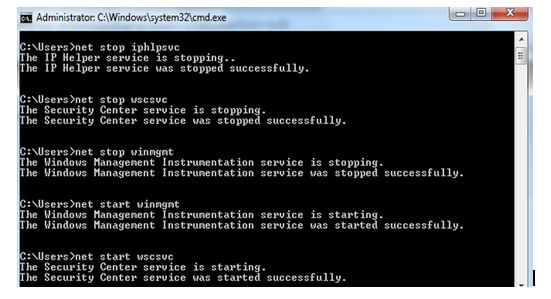
- Once the above process completes, you can reboot your computer and Wmi Provider Host errors and also check for the high CPU usage by Wmiprvse Exe. The process should significantly stop the CPU consumption. If the problem is not resolved, go to next method.
-
Scan and Repair System Files Corrupted if Any from Command Prompt
Do this in the following way. By running the simple commands you can get the issue resolved in just a few minutes.
- Open the command prompt. Do this by clicking Windows Key + R and typing “CMD” in the run box.
- Type the command “sfc /scannow” in the command prompt and click on Enter button.
- Once the command is executed, type the below given next command and click Enter.
DISM /Online /Cleanup-Image /RestoreHealth
- Allow the process to be completed and restart your PC to check that the issue is resolved.
-
Uninstall Process Using Event Viewer
- Open the “Event Viewer”. If you are using Windows 8 / 8.1 / 10, you can do it by doing this. Simply click Windows Key + X and this opens WinX menu.
- From their click on the “Event Viewer”. If you are using Windows 7 or the earlier versions, you can locate the Event Viewer in the start menu and click it to open.
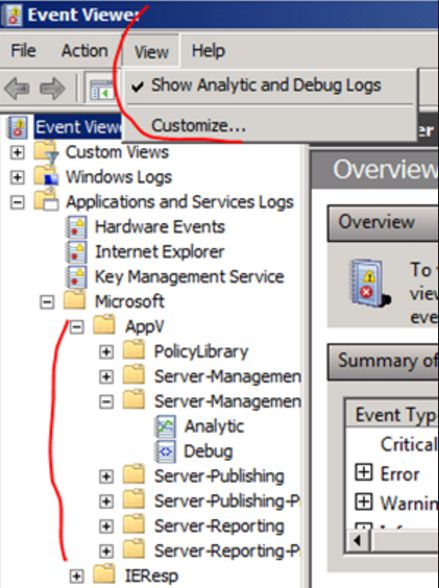
- At the top of the window “Event Viewer” from the toolbar, tap on the “View” and enable the option “Show Analytic and Debug Logs” as shown in the below picture.
- Now, a window will open. In the left pan of it, go to the “Applications and Services Logs” followed by that go to “Microsoft” and then navigate to “WMI-Activity”.
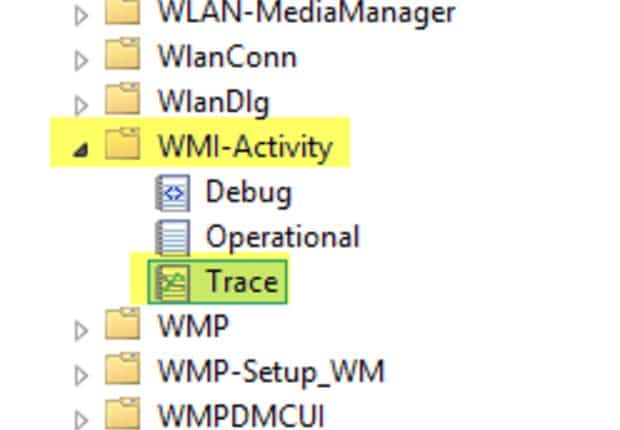
- Double click on the option “WMI-Activity” and this will “expand the contents of it. From the list of contents, you can tap on the “Operational” which will open the operational logs of the WMI Provider Host.
- Check if there are any errors from it. If you find any error, you can click on that error for showing its specifications. The specifications will appear at the bottom of the window.
- Check for the “ClientProcessId” in the General tab of the error specifications that you have clicked. Once you find that, remember that number or you can note it down, for example, ClientProcessId = 1640 as shown in the below picture.
- Now, you can close the window “Event Viewer”.
- Open the “Task Manager”. You can do it as given below.
- Press the buttons Windows + R.

- In the Run, box type the command “taskmgr” and tap on “OK” button.
- Now, the Task Manager will open.
- Go to the tab “Services” from the task manager and search for the service that is having the same “Process ID (PID)” as ClientProcessID that you have noted down which is as shown in the image given below.
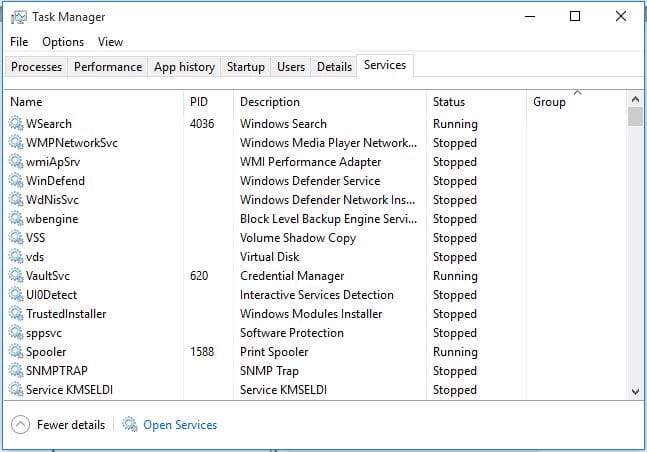
- The service that is having the equivalent process ID as the client process is said to be the culprit that is causing the issue.
- Once you find the culprit, you can immediately disable it or uninstall it. You can do it with the help of below-given steps.
- Go to the control panel from your PC through the search bar or from the start menu of the windows.
- Now, navigate to the “Programs & Features” in the control panel.
- Tap on the program in which the culprit service is for and uninstall it by clicking on the “Uninstall” right to that program.
- Once you uninstall the program, you can check that the issue with the WMI provider host is solved i.e., it reduces the usage of high CPU extremely.
Some of the users have also reported that by doing the Adware and Malware scan the issued has been fixed simply without doing any of the above-mentioned ways. So, you can also give it a try and check the issue is resolved.
Conclusion
This is the various methods that users can make use of to solve the issue WMI Provider Host consuming High CPU in the Windows 10 and other versions of the windows.
So users start with simple solutions as listed here and get rid of the issue in no time. Hope, any of the above-listed solutions would definitely help you out to solve the wmiprvse.exe high CPU windows 7 problem. You can comment for any questions regard wmi host provider or wmi protect host too.
- Watch Movies Online free 2019
- 20 Best sites for watch cartoons online free 2019
- 30 Best Weird Websites 2019