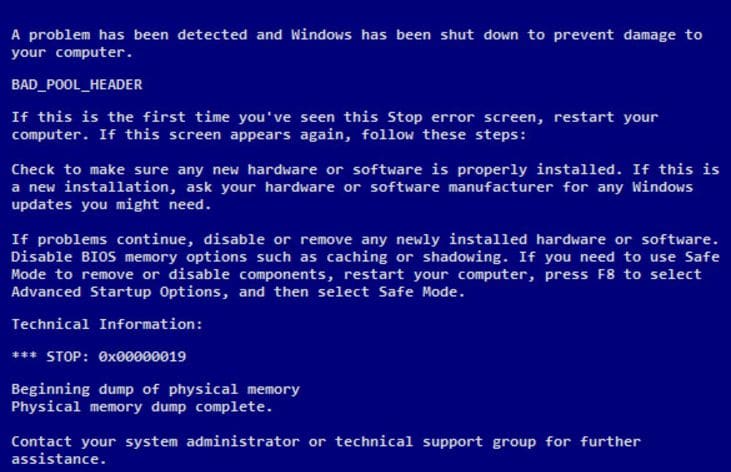
Bad pool header windows 10 is a blue screen error which is having the value of 0x00000019. The error indicates that the header of the pool is corrupted. If you are here with the same error message on your Windows 10 PC, then you can get to know all about the error and how to fix the error with the information given here.
It is said that the error occurs because of the various issues such as the third party antivirus software’s or application, faulty drivers, bad RAM, damaged hard disk and corrupted windows system files. If you have come across this error and worried about it, then get the best solutions to fix the issue of bad pool header windows 7.
Contents
Solutions to Fix bad pool header windows 10 Blue Screen Error
Windows 10 users can start their system in the safe mode to fix the error if you can’t fix it in the normal mode. Even if you are able to start the system in the normal mode,
You can go for the safe mode if you are getting the error again when you are trying to fix the issue. Check out some best solutions to get rid of the stop code bad pool header blue screen error from your PC and work back normally with the below solutions.
Also Read – Free movie streaming without sign up
-
Restart Your PC
Many times, just doing a simple restart of the computer can fix the issues like this. This method would work when few of your system drivers are conflicting when you start your PC. So, just try this simple method and see that the issue is solved before moving on to next solutions.

-
Disable any Third Party Antivirus Software’s
It is said that any of the antivirus applications can cause this error. So if you are using any antivirus software on your PC, you can simply disable it for some time and check that the error is resolved.
By doing this if the problem is solved, you can just uninstall your antivirus application and install other antivirus software that does not raise this issue again.
-
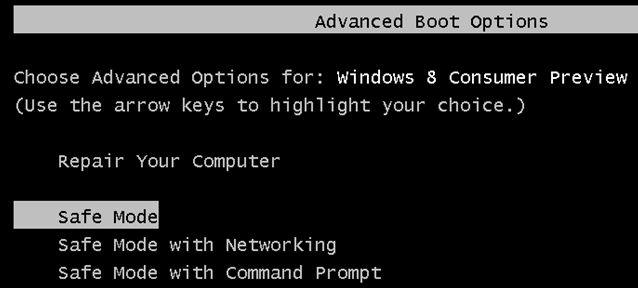
Boot in Safe Mode
Many users have reported that after upgrading to Windows 10 this BSOD error has occurred. So, we have come up with this solution. In such case, the very first thing that the users have to do is Uncheck Fast Startup. You can do this in the following way.
- Go to the search box of your computer and open the control panel from it through search.
- Search for the “Power Button” in the control panel.
- Under the power option tap on “Change what the power buttons do”.
- In the window that appears on the screen, tap on the “Change Settings that are Currently Unavailable”.
- Finally scroll down and under the settings of the Shutdown uncheck “Turn on Fast Startup”.
- Restart your system and check that if the BSOD error resolves.
-
Fast Startup to be Disabled
In windows, by default, the Fast Startup is enabled. In order to disable it, you can follow the below-given steps.
- Click Windows button along with R.
- Now, choose the “Power Options” in the pop-up menu which is as given below.
- From the left panel of the Power options, choose “Choose what the power button does”.
- Tap on “Change settings that are currently unavailable”.
- Now “Turn on fast startup (recommended)” checkbox should be unchecked as shown below and tap on the “Save Changes” button at the bottom of the window.
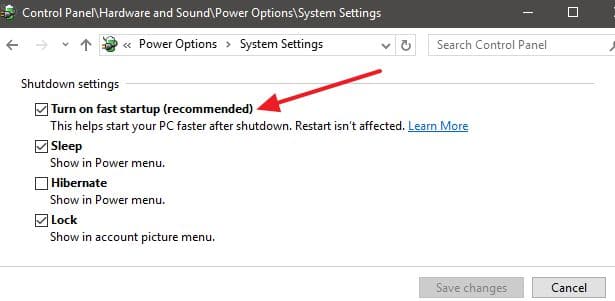
- Restart the system finally and check that if the error still exists.
-
Update all System Drivers
Faulty or missing drivers of the computer can raise this problem sometimes. So, you can try to update all the drivers for your PC as well as the devices. To do this simply follow the below steps.
- Go to the website of the PC manufacturer or else the website of the devices.
- Check for the latest version of the Windows 10 drivers that are compatible with your PC.
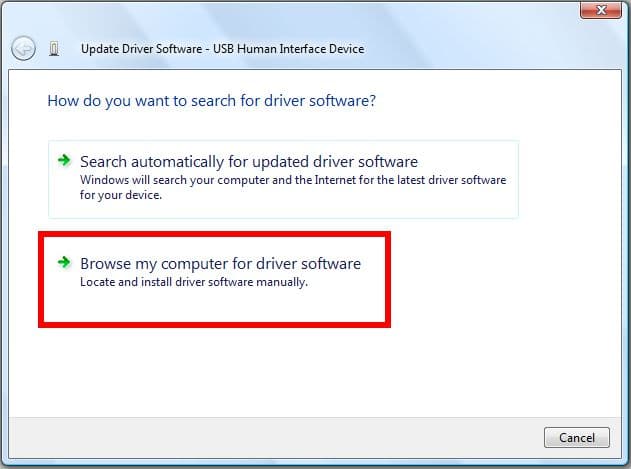
- Download the drivers from the website and update your drivers.
If you feel difficulty in downloading manually the system drivers, you can make use of the applications like Driver easy that can help you. This software can scan your PC and detects if there are any issues with it.
After that, it gives you with the drivers that are best matched with your PC. There are free and professional versions of the software. Using the free version will allow you to update one driver at a time and the professional version allows the users to update all the drivers at once.
-
Do a System Restore
This is one of the best features of the windows. Users who have created a restore point on their PC can make use of it when the errors like this arise on their computer. If you have not set any restore point, you can simply skip this step.
If you are aware of this method then this becomes easy for you to restore to the previous restore point and get the problem resolved. You can see the below steps to do a system restore.
- Go to the search box of the windows and type Control Panel in it and tap on it to open.
- Once the control panel is opened, type “Recovery” in the top right search box of it and click on it.
- Now, you will be able to see the option open “System Restore”.
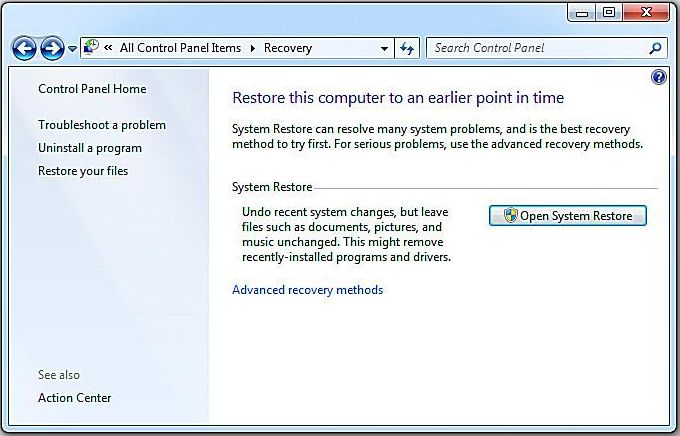
- Tap on Next and select the restore point you have set on your computer.
This helps the users to go back to the previous session of your computer i.e. when your PC is working fine. If this process helps out it is fine, if not go to next method.
-
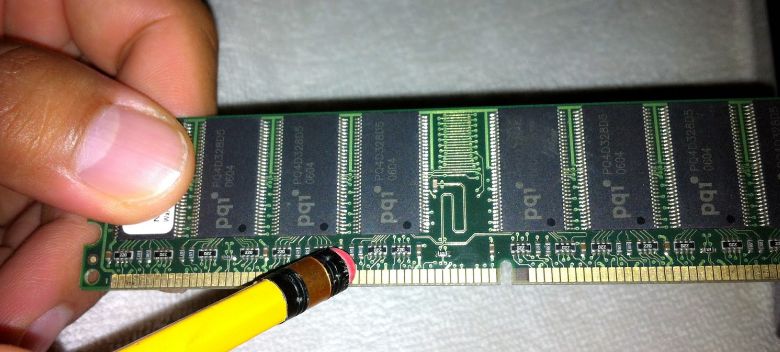
Check and Clean RAM
Bad or dusty RAM can also be the reason for the error. So, it is better to check the RAM. If your RAM is dumped with dust on it, you can take it out of the CPU and clean it. Again put it back on your CPU to check that the error is resolved.
If the problem still persists, you can replace it with the new one. Before doing that, go to the system repair person and cross check with them and if they recommend you to replace the RAM, do it. It will fix Page fault in nonpaged area windows 10 issue too.
-
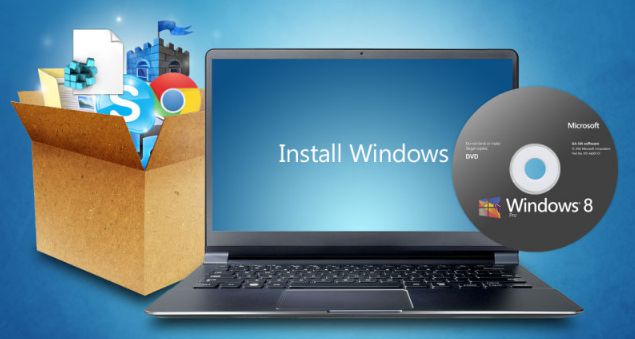
Reinstall Windows
The final and the best solution to follow if any of the above-listed ways does not work is to Reinstall the windows. It is known that reinstalling the Windows will fix all the problems in many cases.
So, better reinstall your Windows and start it fresh without any issues that you have been facing till now with the errors like this. Make sure to avoid all those activities or things that lead you to errors or that makes your system slow down and hang out.
Final verdict on bad_pool_header
These are all the best fixes out there that we have discovered till now. Doing any of these methods according to the actual issue as per the above information would solve the problem and keeps yours away from this error.
So, do follow them and make your system work back as previously. Hope, this bad pool header windows 10 fix guide helps you. Comment below for more about windows bad pool header.
Confirm form resubmission chrome Error
Http Error 503 The Service Is Unavailable
Whea uncorrectable error in windows 10